Introduction
This blog is a collection of static html files sitting on disk. A request to view a page simply transfers the bytes from the static file (via disk or cache) directly to the browser. There is no web application or middle-ware manipulating requests or mangling data behind the scenes. (OK, I admit there is a small node.js web service serving the static files and handling redirects, but the majority is):
1 | app.use(express.static(path.join(__dirname, 'public'))); |
It didn’t always used to be this way.
This article is a history of my decade-old site, as it transitioned over several platforms, and migrated from a dynamic web application to a statically generated blog. It details the nuts and bolts of scraping, parsing, and converting an html site into a series of markdown documents, used for automatically generating a static site with Hexo.
Site History
Almost 10 years ago, this blog started as a C# ASP .NET web application, decked out with an Sql Server database for storing posts, comments, and votes. It had a custom developed content management system (CMS), that I spent countless hours developing. The CMS was fully featured, with secure stored procedure calls for all CRUD methods. It also had multi-user support (even though I was the only user who ever wrote posts on the blog). The site also sported a custom built search engine, which uses full text search against Sql Server. This was handy for SEO, at the time, as search engines would index the keywords and search results, along with article content.
While the site had amazing power, it was quite a chore to backup data and migrate between servers. As one rarely sticks with the same web host for more than a couple of years, it’s usually just a matter of time before a migration of a web site becomes necessary. As many C# ASP .NET or SQL developers know, backing up and migrating a web application is not always easy.
For historical perspective, here is a screenshot of the original site:

Backing It Up
The backup process for this blog had typically involved exporting the Sql Server database, zipping up the web application files, and FTP transferring everything to a remote location. Yes, this was before the days of Git, so FTP had to suffice.
While the powerful features that I had developed for this site were certainly impressive, I was realizing that it was totally over-blown for what consisted of a blog.
Regardless, this kind of development early on, was an incredible learning experience. In fact, I think every developer should give a shot at writing their own CMS at some point, just for kicks.
And so, the .NET beast lived on for many years.
Transition to Node.js
Around the time when node.js began gaining in popularity, I had decided to totally re-write the site into a node.js web application.
I ditched the post voting, which wasn’t very helpful anyway. I moved comments from Sql Server to a 3rd-party service with Disqus (importing comments from Sql to Disqus was actually quite straight-forward). Most importantly, I decided to spin-off the Sql Server database completely. It had always proved to be problematic from a hosting perspective. Not only did hosting the database require additional storage, CPU, and bandwidth, but it also proved to be a bottleneck during high traffic periods. This is especially the case with full-text searching.
I scraped the existing web site and saved off the html files as static files on disk. These html files would be served directly from node.js, forming the beginnings of a statically generated blog.
While blog posts were static html files, the rest of the site was still a dynamic node.js express powered application. The site used the model-view-controller architecture with Jade for rendering views. All other pages, aside from blog posts, came from the MVC views.
Benefits of Moving to Node.js
The node.js application was a much needed improvement. Specifically, it made hosting the site much easier. It also made the site faster to load and more responsive to high traffic periods, especially since the blog posts were now stored as static files. In addition, it had the added benefit of allowing me to get deeply intimate with another technology stack, namely node.js, Jade, and Javascript.
Since Git was now full blown in popularity, managing site changes via a Git repository was an amazing step forward. Versioning, tagging, branching, and merging could all be down without having to copy/paste folders to zip files as a home-grown revision system.
The node.js site worked very well. I was able to internally redirect requests from the old .aspx urls through to the new static file paths. This was perfect for maintaining SEO, as it maintained the existing indexed urls and just served the content from the static files.
Trouble Brewing
While all of this was great, there was a down-side. Since the blog posts were served from static html files, this meant that in order to write a new post, I had to copy and paste an existing post (to get the template layout), and insert new HTML for the article contents. This meant that I was writing articles in HTML!
To do this, I would start by writing an article in plain text. Once completed, I would begin inserting h2 tags and paragraph tags around the blocks of text, for formatting. However, the hardest part was formatting code blocks.
Since this is a programming blog, many of the blog posts contain code samples. Formatting these blocks initially involved pasting the code into an online code formatter and then pasting the cryptic result back into the article, within pre tags. You can imagine how this looked in the HTML content of the article (this will become a bigger problem when moving to a fully static web site later on).
For obvious reasons, this was becoming a pain. Writing the articles in plain text and marking them up with HTML wasn’t all that bad. However, dealing with the code block formatting (whether using an online code formatting tool, pre tags with css, or the code-prettify javascript library) was still a time-consuming process.
Then, I discovered Hexo.
Redesigning a Dynamic Blog with Hexo
Hexo is a tool for generating static web sites, based upon markdown documents. Where I was writing new blog posts in HTML, Hexo would allow me to compose in markdown format. This solves numerous problems, such as easier formatting and the separation of content vs presentation, but most importantly, it made it much easier to handle styling code blocks.
However, there was one problem. How would I get my content into markdown format?
89 Articles and Hundreds of Code Examples
Here is the crux of the problem. As the original site had accumulated over 89 detailed technical articles, each with their own set of code examples, they would need to all be scraped and exported into a standardized markdown format.
The key problem was that article content, having originally existed in an Sql Server database, now resided as HTML within exported files. This is an example of what I was dealing with:
1 | <p>The code below shows a GetURLStream function and includes a default timeout of 5 seconds. If a connection fails to open or the server fails to respond, after 5 seconds your program will break the Internet call and continue moving on to the next link in the queue.</p><p> private Stream GetURLStream(string strURL)<br /> {<br /> System.Net.WebRequest objRequest;<br /> System.Net.WebResponse objResponse = null;<br /> Stream objStreamReceive;</p><p> try<br /> {<br /> objRequest = System.Net.WebRequest.Create(strURL);<br /> objRequest.Timeout = 5000;<br /> ((HttpWebRequest)objRequest).UserAgent = "MyWebRobot/1.0 (compatible; http://www.primaryobjects.com)";</p><p> objResponse = objRequest.GetResponse();<br /> objStreamReceive = objResponse.GetResponseStream();</p><p> return objStreamReceive;<br /> }<br /> catch (Exception excep)<br /> {<br /> Debug.WriteLine(excep.Message);<br /> |
Here is what it needs to be converted into:
1 | title: "Internet Streams and Downloading Files in C# ASP .NET" |
Below is a high-level view of the tasks that needed to be performed:
- Crawl or locate html files, containing article content
- Extract or copy/paste out the article body
- Extract or copy/paste post metadata (title, keywords, description, date)
- Strip html
- Clean code examples
- Add markdown tags for sub-titles, links, images, etc.
- Save resulting markdown and metadata as Hexo posts
Of course, crawling and exporting text from html pages can be a very time-consuming task. This is especially the case when the html tags are not even standardized (remember, the articles span over a period of 10 years, as such, some articles have h2 tags, others have font tags, others use tables, etc).
I decided this was a job for R!
Crawling and Scraping Web Content
To begin the extraction process, I would design an R script that would crawl and scrape the existing site. It would compile a list of all article posts, extract relevant metadata from the html head section, and parse out the id, title, slug, date, and content. Finally, it would save markdown documents (mostly ready for use), along with the raw html export, and a CSV file of the summary. The CSV file would be useful, not only for referencing the old ids with the new slug/urls, but also for compiling redirects.
Here is what it looks like:

Collecting Article Links
The first task was to scrape the sitemap and extract a list of article links. We can do this with the following code:
1 | ## Including the required R packages. |
This code could be called by first downloading the sitemap and then parsing it:
1 | # Create an output folder to hold our files. |
With this start, I now have a complete list of post urls, in the form of a data.frame containing Date, Title, Url, that can be downloaded and individually parsed.
The next step is to download each individual article url and extract the relevant parts of the document. An example of the code that extracts the article is shown below:
1 | collectArticle <- function(fileName) { |
With the above code in place, I was now able to obtain complete extracts of article content and begin saving the html fragments and links.csv summary file.
Through the process of creating the markdown documents, I would need to convert the original urls, that consisted of “/Article123.aspx” into a more human+seo friendly format, “/article-title-goes-here”. To do this, I created a simple friendlyUrl helper method:
1 | friendlyUrl <- function(text, sep = '-', max = 80) { |
Calling the method was as simple as:
1 | friendlyUrl(post$Title) |
Cleaning the code samples was the most difficult part. Some code examples consisted of HTML encoded text, while others resided within pre tags. Several regular expressions were used to parse the various code sample formats and convert them into markdown compatible format.
At this point, I had a list of markdown files with proper metadata headers, although the post content still consisted of html. I would now need to convert the html into markdown.
Converting HTML to Markdown
Luckily, there is the handy html to markdown node.js library to-markdown for doing just this task. It also comes with an online editor for manual conversions.
While the editor worked perfectly well for converting the html to markdown, I needed a way to automate the process to avoid doing this for the 100 or so articles. I wrote a handy node.js app to parse the directory of markdown documents and convert the html to markdown via the node.js npm module.
1 | // |
The above program would read the html article body from each markdown document and convert it to proper markdown format, saving the new file and content. The program took about 15 minutes to write, which saved several hours of manual processing work.
Fixing Mistakes After Automated Processing
As is usually the case with software development projects, 99% of the conversion was straight-forward via the R scraping program, automated node.js scripts, and some manual processing. However, the final 1% took a bit longer.
Several additional node.js automation scripts were created to fix some crawling and processing errors with the markdown documents.
First, I realized, too late, that a “description” field would be useful in the markdown metadata files. This can be output within the web page “head” tags for a meta-description field.
Second, I noticed duplicate tags within the markdown metadata that were using uppercase characters, while others were using lowercase. Normally, this would not be a problem, as search engines (and people) typically are case-insensitive. However, the Hexo template that I was using would count the tags as separate keywords, and thus, not show these articles grouped under the same tag categories. To resolve this, another node.js script was required to parse all markdown files and convert the “tags” metadata field to lowercase.
There were other time-consuming manual processing tweaks to perform, as would typically be required in any major migration project. For example, fixing up an occasional special character, formatting a code block here and there, and other minor tweaks. Overall, the markdown migration was complete.
It’s time to find a new template for the blog.
Finding a Hexo Template
Hexo has a growing community and is somewhat robust, which is one of the reasons I chose it for the static generation platform for this site. Hexo contains a variety of themes and plugins to choose from, most of which are open-source and accessible for customization.
When using any open-source project that you make modifications to, I do recommend considering designing the changes in a generic fashion, so that you can contribute back to the community.
Deploying a Static Web Site
Hexo generates an entire set of static html web page files for your site, based upon the markdown documents. You can deploy the files in a variety of ways.
Since this blog was previously hosted on a Windows server as a C# ASP .NET web application, before being migrated to a Linux server as a node.js web application, the question arose of how to host the new static site?
Since the site is static, it does not require a web application service. The routes are all true (ie., the folder structure in the url actually points to an index.html file within the folder, rather than the route masking that ASP .NET or node.js express use).
Do I Really Need to Host a Contact Page?
Another consideration is around how to implement a contact page for the site. To stay as an entirely true static web site, a contact page would be unable to submit back to the server - since a web application service does not exist.
Luckily, there are a variety of solutions today for hosting a contact page without the necessity of a database. For example, you can create a static contact form and have it submit to a couple of different services, which will email you the data.
Perhaps, the easiest way to host a contact page without even bothering with email, is to simply use a spreadsheet via Google Drive.
I admit, hosting the contact page via Google Drive and having submissions populate a spreadsheet was very tempting. However, I had a couple of reasons for keeping a small node.js web application service running, and as such, continued to have the form post back to the local service. I’ll get to this in just a bit.
Handling 404s
You can use the default web server error handler for displaying error pages. However, since the blog is using a simple node.js web application service, it’s convenient to simply handle 404 errors ourselves.
The following line was added as the last route in app.js to handle unknown requests:
1 | // 404 handler |
For the error controller, the following code will render a static file for our 404 error page, conveniently allowing us to use our static generated pages:
1 | var fs = require('fs'); |
Hosting a Static Web Site on a Cloud Service
There are several creative ways to host a static web site on a cloud service, such as Heroku. Since Heroku requires a web application service signature to host a static site on this platform, we will require some form of an application.
Hosting with a PHP Stub
One interesting method for hosting a static web site on Heroku is to create a simple index.php file, to serve as a PHP application stub. From there, you can create a .htaccess file to disable PHP and add-in all necessary redirects, error pages, etc.
Hosting with a Node.js Server
The method chosen for this blog was to use a small node.js web application service. The service would serve the static files directly from the generated folder, but it would also allow me to include basic route handling for 301 redirecting old blog pages to the new urls. It would also include routes for miscellaneous functionality that I wanted to maintain. As such, I decided to continue having the contact page post back to the service as well.
Note, route handling, redirects, and error pages can certainly be done from a .htaccess file. However, since I had crawled and processed the entire blog history, I had the benefit of compiling a complete summary CSV file with everything required to handle automatic redirects. Let’s take a look at this in more detail, as it’s worth digging into for the sake of maintaining SEO.
Maintaining SEO After Migrating to New Urls
When a new blog launches, some sites will choose to simply drop old urls and begin hosting the new ones - without any type of redirect. In this case, search engines are unable to follow from the old url to the new and must, instead, rely on sitemaps or discoverable links.
To keep the transition from old to new platform as clean as possible, I decided against using a Hexo plugin, and instead leveraged the summary CSV file that was generated during the scraping process. This allowed me to automatically create a redirect.js file as a byproduct. The redirect.js file looks like this:
1 | global.redirect = {}; |
This file essentially creates a hash of old post ids, with each entry holding the new url as its value. Using this file is very easy from within the node.js express routing:
1 | var redirects = require('./config/redirect.js'); |
The above code includes the generated redirect.js file. It detects a request for a url on the old site, attempts to locate the old id within the redirect hash object, and if found, 301 redirects the user to the new page. Since we’re using a hash, the processing for this is optimally fast.
Notice that we include the express.static() call before any redirect processing. This allows us to serve all static web page content from our Hexo site, before performing processing for redirects.
Analytics and Real-Time Users Online
The original site had a useful internal page for displaying real-time analytics of online users. It would show the date/time, user-agent string, article being viewed, and referrer url. While I could easily sunset this feature and simply use the Google Analytics real-time view, I felt that I may as well leverage the local web application.
Since the blog would now be a static generated site, having a view actually rendered from the web application would be unfair. It would also cause a headache when migrating in the future. As such, I wanted to keep all pages as static html files. I would need a way to show real-time users online on a static web page.
Displaying Dynamic Data on a Static Web Site
To render dynamic data from a static page, I decided to use a web service API call. The static page would simply call back to the web API via Javascript, obtain the results in JSON format, and render the results within a div on the page.
Here is the node.js web API method for returning the visitor statistics:
1 | var usersonline = require('usersonline'); |
Since the web API method is tiny and the client page remains static, it would be very easy to replace or remove the page without affecting the rest of the site. Next, the static page:
1 | <script src="https://ajax.googleapis.com/ajax/libs/jquery/2.1.4/jquery.min.js"></script> |
The above is a simple static web page, containing a div for displaying dynamic data. The page includes a script to fetch and render data. Here’s what the script looks like:
1 | function getUsers() { |
The above code fetches the results from the web service API call and renders the data on the page. This is all done from the client’s browser. Just keep in mind, any remote web service may need to support JSONP or CORS for cross-domain requests.
Rendering dynamic data from a web API has several unique benefits over a traditional web application. For example, under intensive traffic, the static web page itself would continue to load, even if the web service API becomes overwhelmed. The user might be unable to see dynamic data, but at least the web site would continue to display. Another benefit is that requests for data are distributed and come from the client’s browser, rather than a web application on a central server. If this were using a remote web API (not our own), this would reduce load on your own web server, while the web API load remains the same.
Data Analysis of primaryobjects.com Articles
What would a site migration be without an analysis of the historical content?
With some basic methods, we can find out some interesting facts about the articles written for this blog. The following statistics are based upon the summary.csv file, created as part of the scraping and migration process.
Article Statistics
Total Articles: 89
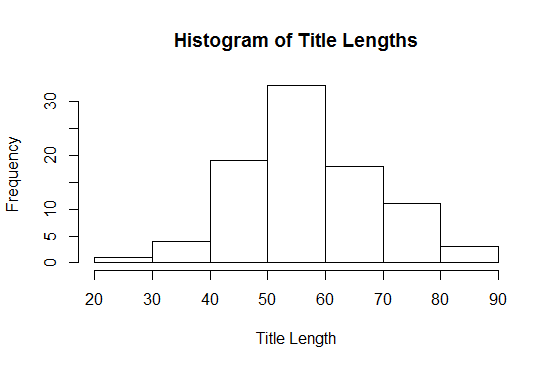
Average Title Length: 58
Average Post Length: 14,934 characters
Shortest Title: “Data Analysis with MongoDb and R“ (32 characters)
Longest Title: “Fluent Interfaces in C# .NET with Expression Builder Method Chaining and RPG Games“ (82 characters)
Longest Word in a Title: “Self-Modifying/Improving“ (24 characters)
Shortest Post: “Fixing: DbLinq Slow MySql Queries, Linq to SQL“ (2,670 characters)
Longest Post: “Generating Flying Creatures in NoSQL RavenDB with C# ASP .NET MVC Razor“ (33,452 characters)

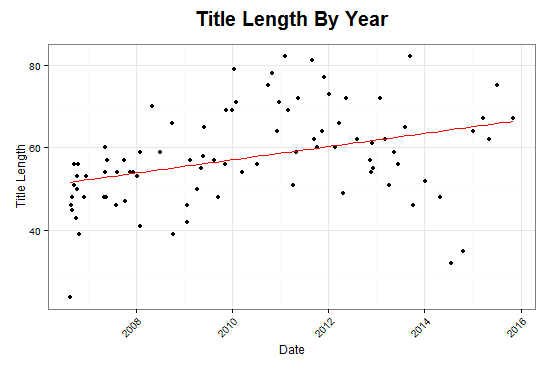
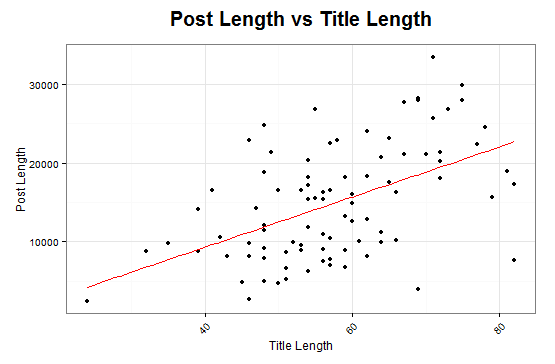
Can the Title Predict the Length of an Article?
Upon comparing title lengths vs post lengths, there appears to be a statistically significant coorelation in the history of my writing!
There is an estimated expected increase of 318 characters for every character increase in title length.
1 | Estimate Std. Error t value Pr(>|t|) |
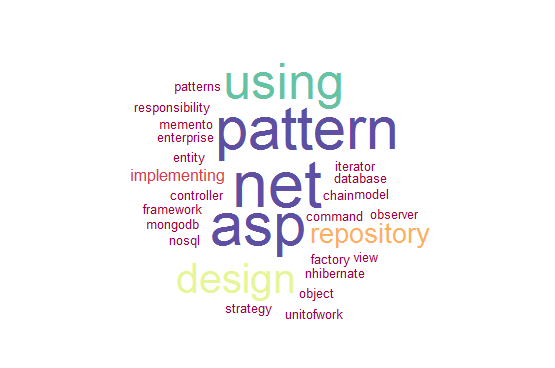
Clustered Topics
By using K-means clustering, we can group the article titles into clusters and find common topics among the articles.
MVC ASP .NET cluster
This cluster consists of the most populous topic within my archives, mainly C# ASP .NET articles. Unsurprisingly, this cluster contains the most articles.

Artificial Intelligence cluster
This cluster managed to group the artificial intelligence and data science-related posts together.

Design Patterns cluster
This one was a bit of a surprise, but very welcome. The algorithm grouped the series of articles related to design patterns into the same cluster.
Conclusion
Things have changed a lot from the humble beginnings of this blog.
As I type this post using a web-based markdown editor, the content changes are being saved into localStorage, and the results are rendered immediately in a right-side panel. Publishing this post will consist of copying and pasting the text into a static .md file in the Hexo source folder. I can then re-generate the static site and push back to the repository origin.
New technology can certainly make things easier. However, getting there can sometimes be a time-consuming task. Through the use of automation scripts and some ingenuity, legacy sites can be brought forward in time.
About the Author
This article was written by Kory Becker, software developer and architect, skilled in a range of technologies, including web application development, machine learning, artificial intelligence, and data science.
Sponsor Me