Introduction
Linquify, our recently released Visual Studio Add-in, is a .NET business class generator for LINQ to SQL and the Entity Framework, providing quick and easy development for ASP .NET data layers.
In this tutorial, we’ll demonstrate some of Linquify’s features by guiding you through the architecture and development of a Silverlight ASP .NET web application utilizing Linquify. The ASP .NET web application will bind a database containing people to a Silverlight DataGrid and allow adding, editing, and deleting of individual people. The web application will use Silverlight as the user interface to demonstrate the use of Linquify as a data access layer, regardless of the GUI user interface implementation. We’ll also create a WCF web service to function as an intermediate business layer.
Getting the Tools for Silverlight Development
The first step to creating our Silverlight ASP .NET web application is to install the Silverlight SDK and web application template for Visual Studio. You can download the installer to get started. Once installed, you’ll have a new project template in Visual Studio 2008.
With the Silverlight SDK installed, you can begin creating a web application in Visual Studio by selecting File->New Project and choose Silverlight Application. Visual Studio will automatically generate a Silverlight Application project, containing a MainPage.xaml, and a Web application project, containing a Default.aspx and associated Siliverlight javascript files.
With the initial Silverlight web application setup, we can get started with our data access layer and Linquify. You can download the source code to the project here.
Creating a Data Access Layer using LINQ to SQL
We’ll be using LINQ to SQL as our ORM generator. Setting up a LINQ to SQL data layer is very straight-forward. We’ll follow the same steps outlined in the Linquify tutorial to create our LINQ2SQL project.
We simply create a new Class Library in Visual Studio by right-clicking our Solution and selecting Add->New Project, select Class Library, and name the project People.DB. Delete the automatically generated Class1.cs. Then right-click the People.DB project, select Add->New Item, and choose LINQ to SQL Classes. Name the file PeopleContext.dbml. We can then open the Server Explorer, by clicking View->Server Explorer, expand our desired database connection, and drag over our selected database tables to include in the LINQ to SQL data access layer.
Using Linquify to Generate our Business Classes with LINQ to SQL
We’ve completed adding a LINQ to SQL class library to our solution, which contains our neccessary tables for working with the People database. We can now generate our Linquify business class library, which will allow us to rapidly develop the complete data access layer.
You’ll need to download and install Linquify, if you have not yet done so.
To use Linquify, we’ll again follow the steps in the tutorial, by highlighting our People.DB project and then clicking Tools->Linquify in the Visual Studio menu.
In Linquify, for the namespace, enter:
People.Types.GeneratedTypes
Checkmark the option to use a connection string specified in the web.config, and enter the name:
MyConnectionString
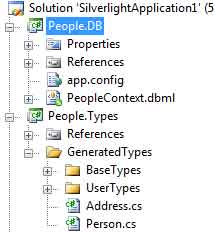
Click the Continue button and a new project will be added to your solution, called People.Types. The project will contain a complete set of business classes for working with your data access layer. Don’t forget to copy the connection string from the People.DB project’s app.config into the Silverlight web application’s web.config file.
Jazzing Up our Linquify Business Objects
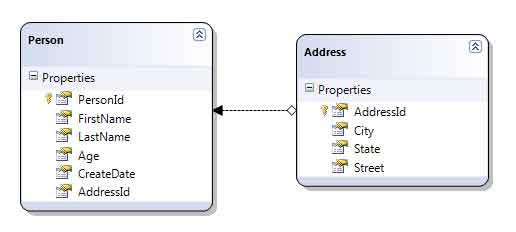
The business classes generated by Linquify would certainly be sufficient for our Silverlight ASP .NET web application. However, to make the business classes more expressive of our data model (which has each Person containing an Address), we’ll extend the user class Person.cs to include a member for the Address type.
Along with the BaseTypes and UserTypes, generated by Linquify, the utility also creates a set of user partial class, which are not over-written on subsequent Linquify generations. This allows us to easily extend our Linquify classes to add custom functionality. We’ll use these partial classes to include an Address member within the Person type.
Adding Meat to the Person Business Class
In the Linquify generated project, People.Types, open the Person.cs partial class and add the following code. This will include an Address member within the Person class, including functionality to load an Address when a Person is loaded and to save an Address when a Person is saved.
1 | public partial class Person |
You’ll notice in the above code, we’ve added a member for Address. We’ve also overridden the OnInitializeComplete() and OnSave() methods to include our extended functionality. Whenever a Person is loaded, we’ll see if he has an AddressId foreign key, and if so, we’ll load the Address for that record. Whenever a Person is saved, we’ll check if the Address member contains data (is dirty), and if so, we’ll save the Address and then save the person. It’s important to note that we save the Address before saving the Person. This resolves the case where a new Address is being saved, in which case the Person will need the AddressId foreign key in order to save the Person object. To get the foreign key, we must first save the Address record, then assign the foreign key to our Person record. If the database relationship were reversed, we could override the OnSaveCompleted() method instead, which would allow us to first save the Person, then save the Address.
Adding a Final Touch to the Address Business Class
The Address business class only requires a small customization to implement our IsDirty property, as follows:
1 | public partial class Address |
In the above code, we’re simply checking if any of the Address fields have been set. If they have, return true, in which case, the Person class will call the Address.Save() method. It’s important to note that Linquify will only call SQL to save those fields which have changed. Upon calling Address.Save(), if the Address class contains all the same data as is already existing in the database, an SQL call will be skipped. Likewise, if only the City property has changed, only the City column will be included in the SQL call by Linquify. This enhances data access performance for our business classes and takes advantage of LINQ to SQL’s optimizations.
Silverlight on a .NET Diet
Our data access layer is 99% complete. We’ve created our LINQ to SQL class and our Linquify business objects. However, since we’ll be working with a Silverlight ASP .NET web application, which runs against a smaller subset of .NET libraries (Silverlight is able to load quickly in the web browser by being built upon a reduced set of .NET assemblies), we won’t be able to directly pass Linquify objects back and forth between the Silerlight GUI and the data layer. In this case, we’ll require a set of DTO or Data Transfer Objects created within a Silverlight class library project, which will reference the same reduced set of .NET assemblies as Silverlight. Our DTOs will map directly to the Linquify business classes and even contain the same property names.
Dressing Up Data Transfer Objects
The Silverlight reduced .NET library subset isn’t the only reason for creating the DTO classes. We’ll also need to label our properties with attributes, to indicate to Silverlight how the fields should be displayed in the user interface. Silverlight has a set of data-bindable controls, such as the DataGrid and DataForm, which can read specific attributes from System.ComponentModel.DataAnnotations and display fields as labeled. We’ll utilize this feature to annotate our DTO classes as needed.
To begin, right-click the Solution and click Add->New Project, select Silverlight Class Library, name the project People.Types.DTO. This will create a class library project containing the same .NET subset references as Silverlight, allowing us to reference the class from the user interface.
The Person DTO
1 | public class PersonViewModel |
In the Person DTO class, we’ve mapped each Linquify property to our DTO property. We’ve included a get/set combination to make the member fields viewable as properties to the Silverlight controls, and we’ve annotated our properties as needed for proper display in Silverlight.
Note that we’ve labelled our primary key and foreign key, PersonId and AddressId, as AutoGeneratedField=false. This prevents the PersonId and AddressId from displaying in our Silverlight controls, yet preserves the values on the server-side.
We’ve also added custom label names, descriptions, and order of display, for each property. This sets the appearance of each property in the Silverlight DataGrid and DataForm controls.
It’s also important to note that we’ve included an Address DTO inside the Person DTO, similarly to how we mapped the Address Linquify business class within the Person business class.
Finally, since our DTO contains the same property names as our business class, we can take advantage of .NET reflection to automatically copy the values from the business class into the DTO when initializing our object. This saves us the tedious work of property value assignment and saves us from writing error-prone code similar to the following:
1 | PersonId = person.PersonId; |
We’ve also included a bonus item in our Person DTO, AddressLine. This is a read-only Property which compresses our Address object into a single string for displaying in the user interface. We’ve included this property to make it easy to work with the Address in our example Silverlight ASP .NET web application. You would not normally need this shortcut, but we’ll take advantage of it for this tutorial.
The Address DTO
1 | public class AddressViewModel |
The Address DTO follows the same mapping as the Address business class. We’ve also included a similar constructor as the Person class had, using .NET reflection to copy the values from our business class into our DTO. We can skip the attribute annotations on the Address DTO since we’ll just be using the AddressLine property in the Person class.
With our DTO classes complete, our data access layer is finished. We now have a set of classes the user interface can reference, which map to our Linquify business classes, and connect to LINQ to SQL. Let’s move on to the business layer.
Creating a WCF Service as the Business Layer
Our Silverlight user interface will be referencing DTO objects to bind data from our database. In this manner, the Silverlight project never has to reference a regular .NET class library and will instead reference our Silverlight DTO class library. However, somewhere we need to add code where our Linquify business classes are called to actually perform the database functionality and we can’t directly reference those classes from Silverlight. The solution is to create a WCF web service. The web service will sit between the Silverlight user interface and the data access layer and will perform our required business functionality of Load, Save, and Delete.
Right-click the Silverlight Web application project, click Add->New Item, then select Silverlight-enabled WCF Service. Name the service PeopleService. We’re going to add 3 web service methods for GetPeople(), SavePerson(), and DeletePerson().
1 | [] |
Our WCF web service accepts and returns DTO objects to the Silverlight user interface. The user interface knows nothing about business classes and works independently of the data access layer, whether it be LINQ to SQL, Entity Framework, nHibernate, and even database platform types.
In the above code, the GetPeople() method simply calls the business class method Person.ToList(), which returns all records in the Person table. We then convert the result to our DTO and return it.
The SavePerson() and DeletePerson() methods operate in a similar manner. The methods accept a Person DTO, convert it to a Person business class, and call the designated Save() or Delete() function on the business class.
Since our WCF web service needs to convert business classes to DTOs and DTOs to business classes, we include the following conversion functions in the web service:
1 | private Person CreatePersonFromDTO(PersonViewModel personViewModel) |
We’re once again taking advtange of .NET reflection to copy the values from one class to the other, since the property names are the same. This saves us from having to write the lines of code for individual member assignment.
Referencing a WCF Web Service from Silverlight
With our web service created, we can now add a reference to it in our Silverlight project. Right-click the Silverlight project (the project containing MainPage.xaml), and select Add Service Reference. Click the Discover button and you should see your WCF web service displayed in the list. Select the web service, enter a namespace of PeopleServiceClient, and click OK.
Open the MainPage.xaml code-behind and add the following using statements:
using SilverlightApplication1.PeopleServiceClient;
using People.Types.DTO;
You can then add a WCF client member to your MainPage class, as follows:
private PeopleServiceClient.PeopleServiceClient _client = new PeopleServiceClient.PeopleServiceClient();
Displaying a Silverlight DataGrid and DataForm
Since our user interface will be using Silverlight, we can include Silverlight controls in the XAML markup, as follows:
1 | <data:DataGrid Name="grdPeople" Grid.Row="1" Grid.ColumnSpan="3" Loaded="UserControl_Loaded" BorderThickness="5" Margin="5" AutoGenerateColumns="True" IsReadOnly="True"> |
The bulk of the XAML code can be found in the source code project, but the above lines show how we’re auto-generating the columns for the Silverlight DataGrid, but manually setting the columns for the DataForm. The DataForm is the control which displays when adding or editing a Person. When working with a Person, we don’t need to display all fields from the DTO. Therefore, we can manually set the specific fields to show to include: First Name, Last Name, and Age.
Binding People to the Silverlight DataGrid Asynchronously
We can bind our list of people to the DataGrid by first calling the WCF web service method GetPeople() when the Silverlight control is displaying. However, since WCF methods work asynchronously, we need to setup async callbacks for the WCF service methods and binding data. Luckily, Silverlight and WCF make this easy by automatically generating delegate events, which we can use as follows:
1 | private void UserControl_Loaded(object sender, RoutedEventArgs e) |
In the above code, UserControl_Loaded() is called to begin binding data to the DataGrid. We call our WCF service’s method GetPeopleAsync() and setup a callback to let us know when the method has completed. Once the web service call is finished (reading from the database, etc), it calls client_GetPeopleCompleted(), where we bind the result to our datagrid. Remember, our WCF web service returns a list of fully-annotated DTO objects, which display in our Silverlight user interface appropriately.
Deleting from the Silverlight DataGrid Asynchronously
We follow the same manner for the Delete functionality as well:
1 | private void btnDelete_Click(object sender, RoutedEventArgs e) |
In the above code, btnDelete_Click() is called when the user clicks the Delete button. We create a Person DTO based upon the selected DataGrid item (remember, our Silverlight DataGrid holds DTO objects). We then pass the DTO to our WCF web service’s DeletePersonAsync() method. Upon completion, we simply re-bind the Silverlight DataGrid.
Adding New Items to the Silverlight DataGrid Asynchronously
When the Add button is clicked, we want to dim the DataGrid and display the DataForm edit control, as follows:
1 | private void btnAdd_Click(object sender, RoutedEventArgs e) |
In the above code, we give the DataForm a copy of an empty Person DTO object. The Silverlight DataForm controls uses this object to know which fields to display in the user interface. When the user completes editing the data and clicks OK, the method frmAddPerson_EditEnded() is called, as follows:
1 | private void frmAddPerson_EditEnded(object sender, DataFormEditEndedEventArgs e) |
In the above code, we get the Person DTO from the DataForm and pass it to our WCF web service’s method SavePersonAsync(). Since our Linquify business classes can make the determination to save or update an object, depending on the existence of a primary key value, we can take advantage of less code by having a single EditEnded() method in our user interface and single Save() method in our web service. Whether the person is new or updated will function regardless.
Taking the above into account, we can create a btnEdit_Click() method as follows:
1 | private void btnEdit_Click(object sender, RoutedEventArgs e) |
In the above code, the method is called when the user clicks the Edit button. Remember, in the btnAdd_Click() method we assigned an empty Person DTO to the DataForm control. In the Edit function, we get the Person DTO from the Silverlight DataGrid and assign that to the DataForm control. This allows us to populate the data in the Silverlight DataForm control for editing. When the user clicks the OK button in the DataForm, the same frmAddPerson_EditEnded() method that the Add button used will be called. This calls the same Save() method in the WCF web service, passing the resulting data to our data access layer, allowing Linquify and LINQ to SQL to save the data accordingly.
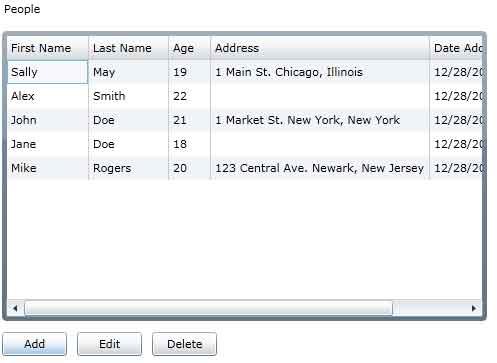
The Silverlight DataGrid using Linquify and WCF
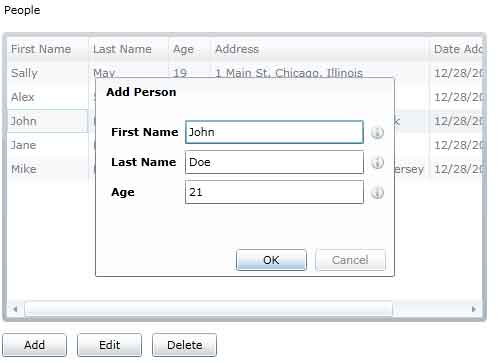
The Silverlight DataForm Editing a Record
Conclusion
Linquify makes it easy to rapidly develop a .NET data access layer in connection with LINQ to SQL or the Entity Framework. By extending the Linquify generated business classes and including DTO data transfer objects, a robust ASP .NET web application can be developed with the capability to support a variety of user interfaces, including ASP .NET, Silverlight, and more. Silverlight’s DataGrid and DataForm controls make it easy to bind to Silverlight DTO class libraries. When used in conjunction with WCF web services, DTO classes can be easily bound to Linquify business objects and persisted in the database, forming a complete 3-tier .NET web application architecture.
About the Author
This article was written by Kory Becker, software developer and architect, skilled in a range of technologies, including web application development, machine learning, artificial intelligence, and data science.
Sponsor Me