Introduction
A variety of software mapping development kits are available for use in C# ASP .NET web applications, including Google Maps, Mapquest, Bing, and more. However, with Microsoft’s recently released Bing Maps for Silverlight and C# ASP .NET, it’s become quite easy to develop a mapping web application with visually enhanced graphics and smooth transition effects.
In this article, we’ll step through the process of creating a basic C# ASP .NET web application, using Silverlight and the Microsoft Bing Maps SDK. We’ll create a map with an Aerial and Road view, and allow the user the create pushpin marks by clicking the map. When the user hovers the mouse over a pushpin, we’ll display a popup textbox, containing the latitude, longitude, and a custom message. The user will be able to click a pushpin to edit the text, providing the framework for persisting map location information to a database, web service, or network.
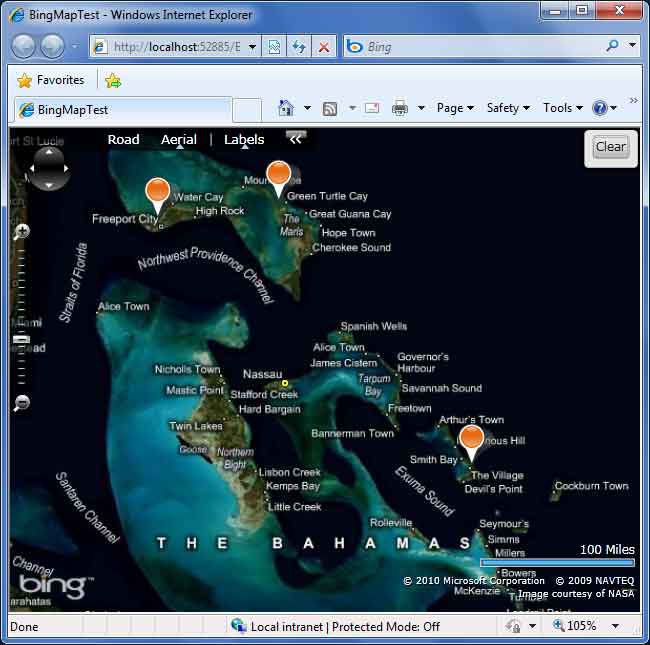
A Microsoft Silverlight Bing Map with 3 pushpins created.
Checking the Tool Belt
Before beginning, you’ll need to download and install the Silverlight SDK, web application templates for Visual Studio, and the Microsoft Bing Map SDK. To implement the WCF service and data access layer, you’ll need the Entity Framework and Linquify. You can download the source code to this project here.
With the Silverlight SDK installed, you can begin creating a web application in Visual Studio by selecting File->New Project and choose Silverlight Application. Visual Studio will automatically generate a Silverlight Application project, containing a MainPage.xaml, and a Web application project, containing a Default.aspx and associated Siliverlight javascript files.
Setting Up the References
To begin using the Microsoft Bing Map SDK, we’ll need to add two references to our Silverlight project. You can do this by right-clicking the Silverlight project in Visual Studio (the project containing App.xaml and MainPage.xaml) and selecting Add Reference. Then browse to select the following references:
1 | C:\Program Files (x86)\Bing Maps Silverlight Control\V1\Libraries\Microsoft.Maps.MapControl.dll |
Next, add the Microsoft Bing Map SDK using statement to the top of the MainPage.xaml.cs file, as follows:
1 | using Microsoft.Maps.MapControl; |
The final step in our setup is to add the namespace reference in the MainPage.xaml file to reference the Bing Map SDK. You can do this by adding the reference into the UserControl tag at the top of the MainPage.xaml, as follows:
We’ll be adding the tag:
1 | xmlns:m="clr-namespace:Microsoft.Maps.MapControl;assembly=Microsoft.Maps.MapControl" |
The complete UserControl tag will appear as:
1 | <UserControl x:Class="BingMapTest.MainPage" |
Notice, we’ve added the xmlns:m namespace within the UserControl tag. This allows us to reference the Bing Mapping controls from the SDK within the Silverlight XAML file.
We can now get started with setting up the user interface controls.
Making a Map
Adding a Microsoft Bing Silverlight Map to a page is quite easy, and simply involves adding the tag <m:Map /> to the page. However, we’ll add a few extra parameters to set the display mode, assign a name for our server-side code to reference, and provide credential information.
Our mapping tag will appear as follows:
1 | <m:Map CredentialsProvider="your-credentials-key" Name="ctlMap" Mode="AerialWithLabels"> |
Notice, you’ll need a CredentialsProvider key in order to use the Bing Map SDK. You can obtain a key for free at the Bing Maps Portal. Once signed up, you’ll be able to access the server to pull mapping information.
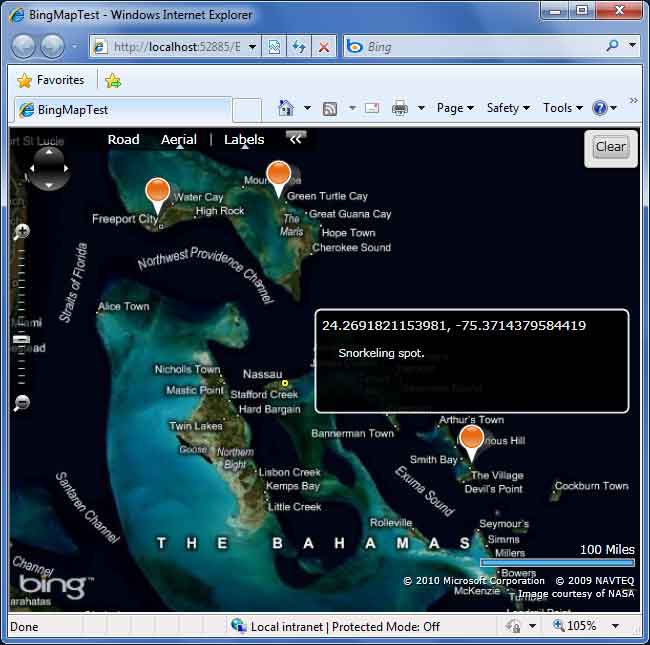
Hovering the mouse over a pushpin displays an InfoBox popup with text.
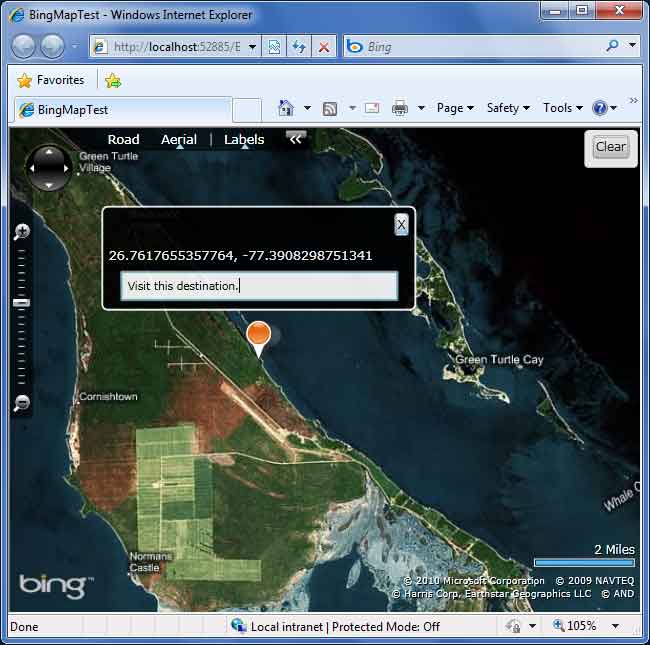
Clicking the pushpin displays the InfoBox popup in edit mode, allowing the user to change the text associated with the pushpin. After editing the text, the user can click the ‘X’ button to close the InfoBox, save the location data, and set the map back to View mode.
Making an InfoBox
While the above XAML will produce a basic map, we need to add a few more tags to support our pushpin markers and popup textbox labels. We can do this by adding the following complete code to our MainPage.xaml:
1 | <UserControl x:Class="BingMapTest.MainPage" |
Notice in the above code, we’ve created a bordered menu, containing a Clear button. This will allow us to clear all pushpins from the map. It also provides an example of how to create a button in a Silverlight C# ASP .NET web application and handle the click event.
We’ve also defined a new map layer, containing a bordered InfoBox. This is our popup text, which will appear when the user hovers the mouse over a pushpin. The InfoBox contains a TextBlock, which serves as our read-only label for the pushpin. It also contains a TextBox, which serves as the edit field when the user clicks the pushpin to edit its text. We’ll control the visiblity of the InfoBox in the server-side C# code so that the TextBlock is only visible when in hover-mode and the TextBox is only visible when in edit-mode.
With our XAML code complete, we can move on to adding functionality for the map.
Initializing the Map
We’ll start by initialing our map to a specific location, based upon a latitude and longitude. While you can easily lookup a desired location, for this example we’ll choose (40.13, -74.46), which happens to be Trenton, NJ.
1 | public MainPage() |
In the above code, we’ve assigned a location to the Center property of the map. This tells the map what point to center on in the display. We also set a ZoomLevel, which should encompass most of the state of New Jersey. Finally, we assign a mouse-click event to the map control. This allows us to handle the mouse click event and create a pushpin at the point where the user clicked the map. Our event handler for the click event will be ctlMap_MouseClick.
Before moving on to the code for the click event, where the pushpins are created, we need to create some basic state properties to control whether we are editing a pushpin’s text or just viewing them.
Adding State to the Map
Since we’ll be creating pushpins, which can be edited by the user, our map will actually have two states: Edit or View. When in View mode, the user can hover the mouse over a pushpin to display the popup text. When in Edit mode, the user can type new text in the pushpin, and hovering the mouse anywhere else will not affect the map until the editing has completed. We can control the state of our map with a simple state property as follows:
1 | protected enum EditState |
In the above code, we’ve defined a simple enumeration for the edit state, On or Off. We’ve also defined a variable to hold the pushpin we’re currently editing (when in Edit mode). We can therefore toggle the state flag by checking if our editPin has a value or not. When editPin has a value, we must be in Edit mode. Otherwise, we’re in View mode.
Handling the Map Click Event
When the user clicks the map, we’ll create a pushpin at the target location. The pushpin will display the latitude and longitude of the point clicked and allow the user to type a custom message. The pushpin will actually store the custom message within the Tag property. You could certainly create a class which wraps the pushpin and contains a property specific to storing the custom text, but for this example, we’ll hack the property.
1 | void ctlMap_MouseClick(object sender, MapMouseEventArgs e) |
In the above code, the first thing we check is if we’re in Edit mode. If we’re in Edit mode, we do not want to add a new pushpin when the user clicks the map. The user will have to finish editing the pushpin text before adding new pushpins. Assuming the map is in View mode, we can proceed to add a new pushpin to the Microsoft Bing Silverlight map.
We create a pushpin by assigning a location. We then utilize the Name and Tag properties to store our custom text for the popup InfoBox. Finally, we register three event handlers for catching the mouse-hover event, mouse-leave event, and the mouse-click event. Remember, these events are on the pushpin - not the map. This will allow us to change the map to Edit mode when the user clicks the pushpin. It will also allow us to popup the InfoBox when the user hovers over the pushpin.
The final step to displaying the pushpin is to add it as a child element to the map, with ctlMap.Children.Add.
Let’s move on to handling the mouse-hover event, which pops up the InfoBox.
Popups on the Map
The MouseEnter event for a Silverlight Bing Map pushpin occurs when the user hovers the mouse over the pushpin. Since we’ve registered for this event on our pushpin, we can display the InfoBox from our MainPage.xaml when this occurs, by using the following code:
1 | void pin_MouseEnter(object sender, MouseEventArgs e) |
As always, our first step is to verify that we’re in View mode. If we’re in Edit mode, we won’t show the popups until the user completes editing the pushpin text. Assuming we’re in View mode, we begin by obtaining the pushpin the user hovered over. This is provided in the sender parameter. We can then populate our InfoBox with the Name and Tag properties from the pushpin. We’ll then display the InfoBox by changing its Visibility value and set the display location to be next to the pushpin.
When the user hovers off of the pushpin, we can hide the InfoBox using the following code:
1 | void pin_MouseLeave(object sender, MouseEventArgs e) |
Clicking a Pushpin to Edit
We’ve registered for the MouseLeftButtonUp pushpin event, which lets us know when the user clicks a pushpin to begin editing its text. When this event occurs, we’ll change the state of the map to Edit by assigning a value to the temporary editPin property. This allows us to know which pushpin we’re editing.
1 | void pin_MouseLeftButtonUp(object sender, MouseButtonEventArgs e) |
In the above code, we set the value for editPin to be the pushpin that was clicked, obtained via the sender parameter. We then display the InfoBox, including the editable TextBox control. We set the text for the TextBox to be the pushpin’s Tag property.
Saving the Pushpin Text
Once the user has finished changing the text in the InfoBox’s TextBox control, he can click the ‘X’ close button to dismiss the pushpin InfoBox and change the state of the map back to the View state. We’ve defined a click event for the btnClose control in the MainPage.xaml file, which is handled in the following code:
1 | private void btnClose_Click(object sender, RoutedEventArgs e) |
In the above code, we first hide the InfoBox by setting its Visibility back to hidden. We then copy the value from the InfoBox’s TextBox (the text the user changed) to our editPin pushpin. Remember, editPin is a reference copy of the pushpin we’re currently editing. Any changes we make to editPin will be reflected in memory on the actual map’s pushpin. Therefore, we can simply set the editPin.Tag property to the TextBox.Text. The pushpin’s description has now been updated. The user may now hover over the pushpin with the mouse to display the new text.
Clearing the Map of Pushpins
The final control to implement is the Clear button. This allows the user to erase all pushpins from the map. When clicked, we’ll enumerate the UIElement objects on the map, and find those which are pushpins, as follows:
1 | void btnClear_Click(object sender, RoutedEventArgs e) |
Notice in the above code, we make a first pass through the elements of the map to prepare a list of pushpin elements. We then enumerate through the list of pushpins and delete each one from the map. We actually require two separate loops since we cannot modify the map while enumerating its children.
Binding Things Together With WCF, the Entity Framework, and Linquify
At this point, we have a fully functional Silverlight Map web application, allowing the user to store unique information within pushpin locations throughout the map. We can further extend the functionality of the Silverlight C# ASP .NET web application by adding database support to load, save, and process the location information added by the user via pushpins.
In order to utilize a database with the Silverlight application, a WCF service would be required to serve as the intermediate between the Silverlight compact .NET project and the database project. The WCF service will reference a database project, utilizing Linquify and the Entity Framework.
The first piece to connect, for database functionality, is to assign an ID to each pushpin. This can be provided within a class wrapper for the pushpin, or for simplicity, one could re-use the pushpin.TabIndex property (for integer IDs). Using this method, creating a pushpin would appear as follows:
1 | Pushpin pushpin = new Pushpin(); |
This provides the core framework for saving and updating a pushpin in the database, based upon a primary key ID.
Saving a Pushpin to the Database
With a WCF web service implemented, functionality can be added to the btnClose_Click() event, which occurs when the user closes the pushpin’s InfoBox in Edit mode. At this point, the pushpin can be persisted and saved to the database as follows:
1 | private void btnClose_Click(object sender, RoutedEventArgs e) |
Notice, we’ve added code to the end of the btnClose_Click event to prepare a DTO object and call the WCF service’s SaveLocation method. When the Save method has completed, we need to obtain the ID, created in the database, and assign it to the pushpin, as follows:
1 | void _client_SaveLocationCompleted(object sender, SaveLocationCompletedEventArgs e) |
Remember, since the editPin references the currently edited pushpin in memory, we can modify its TabIndex property to update the ID of the pushpin with the primary key created in the database.
Loading Pushpins From the Database
We can extend the initialization of the Silverlight map by loading locations from the database, as follows:
1 | private void LoadPushPins() |
The above method, LoadPushPins(), would be called in the end of the MainPage() constructor. We call the WCF service’s GetLocations() method, which in turn, uses Linquify and the Entity Framework to return a list of all locations in the database. For each location found, we create a pushpin on the Silverlight map. Each pushpin contains the primary key ID and text information, which can be edited and updated by the user.
The WCF Service Does the Hard Work
The WCF service code to handle the database requests, using Linquify and the Entity Framework, would appear as follows:
1 | [OperationContract] |
While the database layer is handled using the .NET Entity Framework, we can take advantage of our Entity Framework business classes, generated with Linquify, to rapidly query the database to load and save location information from the pushpins.
While the above is just a short description of extending the Silverlight map web application with database functionality, you can read more about Creating Silverlight Web Applications with Linquify, LINQ to SQL, and WCF.
Conclusion
In this article, we’ve stepped through the process of implementing the Microsoft Bing Silverlight Map SDK. We’ve implemented the ability to add popup labels and editable pushpins to the map, allowing us to store unique information within each pushpin. With the above implementation, the mapping web application can be extended to support loading locations from a database with the Entity Framework, allowing updates by the user, and saving locations back to the database or over a network. The Microsoft Bing Silverlight Map SDK provides an easy way for developing complex mapping applications on the web.
About the Author
This article was written by Kory Becker, software developer and architect, skilled in a range of technologies, including web application development, machine learning, artificial intelligence, and data science.
Sponsor Me