Introduction
It’s common for growing companies to offer multiple web sites and services. Initially, each site may have its own login system, or at the very least, certainly its own login page. As their user base grows, they may eventually find the need to consolidate their network of sites under a common login page and authentication framework. Examples of this include Google (Gmail, Drive, Store, FeedBurner), Microsoft (Outlook, Live, Bing), Yahoo (Mail, Finance, Answers), as well as many others. Unauthenticated users, accessing any of the associated web sites, are redirected to a common login page. The login page usually resides on a completely separate web service and domain, such as login.yahoo.com, login.live.com, or accounts.google.com. In the world of C# ASP .NET, this process is called federated authentication, and can be implemented using the Windows Identity Foundation library.
The Windows Identity Foundation (WIF) comes built into the .NET 4.5 framework. This makes it easy to get started, without the need for installing additional libraries. In this tutorial, we’ll walk through the steps of implementing federated authentication with single sign-on. We’ll create a C# MVC4 ASP .NET web site and a common authentication web site identity provider (also called a Secure Token Service or STS). The identity provider web site will provide the login form, using forms authentication, and redirect back to the calling web site.
At the end of this tutorial, we’ll have a web site using single sign-on via the Windows Identity Foundation that redirects users to login via a common authentication provider. Additional sites may be scaled in, using the same identity provider web site as needed.
Getting Started
We’ll start by creating our identity provider web site (STS). This web site will display the login form and allow a user to enter their username/password. After signing in, the user will be redirected back to the calling web site, as a fully authenticated user.
To get started, we’re going to need an SSL certificate for the identity provider. Specifically, we need the public key. We’ll host the public key as a metadata file on our identity provider web site (the relying party web sites will point to this metadata url in their web.config files). Luckily, we can generate a test cert fairly easily.
Creating an Identity Provider Certificate
First things first. We begin the process by creating an initial SSL certificate that will be used by the identity provider. A test certificate can be created in a variety of ways, such as by using IIS to generate a test cert or by using a tool, such as Pluralsight’s SelfCert creator.
For this example, we’ll use the SelfCert tool and create a test certificate. When creating the certificate, specify the value for “X.500 distinguished name” to be: “cn=customsts.dev”. Choose to save the cert in the location “LocalMachine” under the store “My”. This will ensure the certificate is accessible by the identity provider, when running under the LocalSystem application pool (we’ll get to that in a bit).
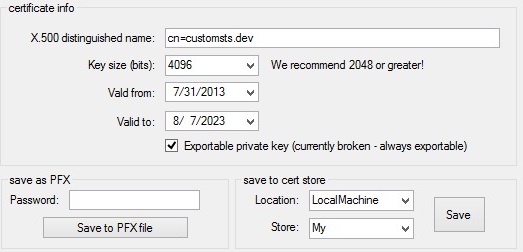
If you get an access violation error while trying to store the certificate, you can simply save the certificate to your desktop and then double-click it to import and store it. Again, be sure to select “Local Machine” as the storage location.
Extracting the Public Key from the Certificate
With the certificate created and stored, next we need to grab the public key. To do this, open a command prompt and type “mmc.exe”. Then click File->Add/Remove Snap-in. Select Certificates and click Add. Select “Computer account” and click Next, then click Finish.
Navigate to Certificates/Personal/Certificates and you should see “customsts.dev” located in the list along the right-side. Double-click the certificate to open the properties. Click the “Details” tab and then click “Copy to File” to export the certificate.
In the export wizard, select “No, do not export the private key”, since we’re only interested in the public key. Then choose “Base-64 encoded X.509 (.CER)” as the export type. Save the exported file to your desktop and open it in Notepad. We’ll need the contents of this key for our identity provider web site’s metadata file.
Creating the Identity Provider Web Site
Hooray, we’ve got a public key. Although that was quite a bit of work, we’re now ready for the next step. It’s time to create the STS web site that will host our login form.
Creating the Federation Metadata File
We’ll begin by creating a new MVC4 C# ASP .NET web site named “SingleSignOn”. In the web project, create a new folder called “Federation”. Inside the folder, add a new XML file called “metadata.xml”. For the contents of this file, paste in the following code:
1 | <!--?xml version="1.0" encoding="utf-8"?--> |
Note the placeholder for your public key string in the above xml. You should copy and paste the public key string from your exported certificate file into the appropriate space above. Be sure not to include the “Begin Certificate” and “End Certificate” tags. Also, take note not to accidentally copy the first xml descriptor line twice (a common mistake when copying/pasting xml).
Configuring the Identity Provider to Support Windows Identity Foundation
Next, we need to add the appropriate settings to our web.config file to enable Windows Identity Foundation. We’ll start by adding the following appSettings keys:
1 | <add key="IssuerName" value="http://customsts.dev/" /> |
Next, set the Federation folder available for anonymous users. All users will need to be able to read this file in order to login with single sign on. We’ll deny access to all other pages on the STS identity provider web site, as follows:
1 | <location path="Federation"> |
Next, since our single sign-on common web site will use forms authentication, we need to enable it as follows:
1 | <authentication mode="Forms"> |
Adding the Identity Provider Login Controller
We’re now ready to start coding the identity provider’s web controllers. First, add a reference to your project for System.IdentityModel and System.IdentityModel.Services.
Next, create a new LoginController, which will serve as the login form on the web site.
1 | [HttpGet] |
In the above code, we have a simple hard-coded authentication check. You will probably want to extend this to authenticate against a database or web service. Note, we set the FormsAuthentication cookie, which sets up the MVC ASP .NET User object. After authentication has completed, we redirect to the returnUrl. In this case, it will actually be our Windows Identity Foundation redirect url, where our controller will set the necessary federation properties.
We’re using the following simple LoginModel for the login form:
1 | public class LoginModel |
With the login controller defined, we can create the associated login view, using the LoginModel as its backing class.
After authenticating and logging in, our Login controller method redirects to the returnUrl. Since we’re using Windows Identity Foundation, the returnUrl will be our root url and will include several QueryString parameters that indicate the type of WIF action that is being performed. In this case, the action will be “wsignin1.0”. Therefore, we’ll now begin creating the HomeController to process this message.
Adding the Identity Provider Home Controller
As was seen in the Login Controller, after authenticating, the user is redirected to the root page on the identity provider web site. It is here that federated authentication will take place via the Windows Identity Foundation framework.
WIF will provide several querystring parameters in the url, indicating the type of action being performed. The common ones include: wsignin1.0 and wsignout1.0. We can process these actions in our HomeController with the following code:
1 | public const string Action = "wa"; |
The first item to note is our definition of actions, via the querystring parameters, for signing in and signing out. For sign-in, a formdata string is created, which gets returned back to the browser as a form post, thus completing the sign-in process. This technique is described in detail in a great blog post at Building a simple custom STS using VS2012 & ASP.NET MVC.
The HomeController uses a utility security class, CustomSecurityTokenService.cs (provided via the author in the above link), to handle processing the sign-in message. This class inherits from SecurityTokenService and provides the required methods for processing the sign-in request.
Note, since the MVC controller requires access to the HttpResponse object, we’ll need to store a copy of this earlier on in the MVC ASP .NET request chain. We can do this within BeginRequest in Global.asax.cs as shown below. The HttpContext.Items object is persisted for a single HTTP request, which is just long enough for us to access it in the controller.
1 | protected void Application_BeginRequest(Object sender, EventArgs e) |
Windows Identity Foundation Redirect Flow
If you monitor the network requests, upon accessing a protected page on the relying party web site, you’ll see the following series of request created from our Login and Home controllers:
- User accesses a protected page on the relying party web site:
1 | http://localhost/user |
The final “200 OK” request is where our identity provider web site login form displays, allowing the user to enter their credentials on the central login form. After the user enters their details and submits the form, the following series of requests are issued:
- User enters their credentials on the central login page and clicks Submit:
1 | POST http://customsts.dev/login?returnUrl= |
The first POST checks the username and password and sets the FormsAuthentication cookie. It then issues a redirect to the returnUrl. Since we’re using Windows Identity Foundation, the returnUrl leads us to the root page on our identity provider web site. Since the user has been properly authenticated via forms authentication at this point, the root page processes the federated authentication and issues a form POST back to the relying web site, with the WIF STS security token (trust:RequestSecurityTokenResponseCollection) as part of the form post data.
The process flow is completed on the relying party site, upon processing the STS token and authenticating the user on the initiating relying party site.
Creating a Relying Party Web Site
With our central single sign-on web site defined using C# MVC ASP .NET Windows Identity Foundation and STS, we can now create our relying party web site (a web site that authenticates using the single sign-on identity provider site). To begin, create a new C# MVC4 ASP .NET web site. We’ll need to configure the web.config to use Windows Identity Foundation WIF. This can be done with the Visual Studio 2012 Identity and Access add-on or it can be configured manually, as shown below.
Above the appSettings section in the web.config, add the following configSection declarations:
1 | <configsections> |
Add the following appSettings:
1 | <add key="ida:FederationMetadataLocation" value="http://customsts.dev/federation/metadata.xml" /> |
Note, the first appSetting key provides the public url to our metadata XML file, created in the first step of this tutorial.
Next, if any pages on this web site will be public (not require a logged-in user), you can define them as being available to anonymous users with a location block, as follows:
1 | <location path="public"> |
The above code sets the path /public available for all (including non-authenticated) users. For all other pages, we’ll define them as protected, requiring a login. We’ll also disable the default authentication, allowing WIF to take over handling authentication. Add the following code under the system.web section:
1 | <authorization> |
Alternatively, if you want all pages to be public, except for certain folders, you can use the following:
1 | <location path="user"> |
Under the section system.webServer, we’ll need to define the WIF authentication modules, as follows:
1 | <modules> |
Note, you can find the thumbprint string for the above configuration by opening mmc.exe (as shown in the steps in the first part of this tutorial), opening the properties of the identity model certificate, click the Details tab, and scroll down to the Thumbprint field. You’ll probably have to type this value in manually (mmc doesn’t appear to allow copy/paste), so type it carefully.
Also, add a reference to your project for System.IdentityModel and System.IdentityModel.Services.
Creating the Relying Party Controllers
We’ll create a plain HomeController to serve as the root landing web site page. This page will contain a link pointing to /login, allowing the user to manually sign in.
1 | public class HomeController : Controller |
For the login page, we’ll create a LoginController. We won’t actually need a view for this page, since we’ll be immediately redirecting to the identity provider web site. However, MVC will throw an error if a view does not exist. A default view can be added for the LoginController. Inside the login controller Index method we’ll add a call to the Windows Identity Foundation redirect call. This manually redirects the user to the central STS single sign-on login web page. Alternatively, you could simply direct the user to a protected page, such as /user, in which case the web.confing “location” permissions will automatically direct him to the identity provider login page, as well. You can test both scenarios by clicking the Sign In link and by navigating directly to /user as an unauthenticated user. Both actions will lead to the central federated authentication login page.
1 | public class LoginController : Controller |
Our third controller will be for protected (logged-in) user content. The UserController will have a main Index page, where we’ll simply display @User.Identity.Name for the authenticated logged-in user, and a Logout method. The Logout method will delete the cookie on the relying party web site and on the identity provider web site. It does this through another flow of redirects to the identity provider, in order to properly delete both cookies and clear out the authentication ticket.
1 | public class UserController : Controller |
Setting Up IIS to Host the STS Identity Provider
With the web sites developed, we’ll want to try testing out the login process. First, you should set the proper security on the web folders by ensuring the user IIS_IUSRS has read access to both the identity provider STS web site and the relying party web site.
Next, open IIS and create a new Application Pool. Set the “Identity” property on the application pool to run under “LocalSystem”, so it can access the certificate (that we stored in the first step of this tutorial).
Create a new web site under “Sites”, named “customsts.dev”. Point it to the folder for your identity provider web site project. For the bindings, use the host name “customsts.dev” and choose port 80. Since we’re using a custom host name, we’ll also have to modify the system32/drivers/etc/hosts file to include a setting for 127.0.0.1 customsts.dev
Note, be sure to set the application pool for the customsts.dev web site to use the LocalSystem identity, as mentioned above.
Next, create a new web site under “Sites”, named “relyingparty1”. Point it to the associated folder in your web project. Set this site to run on port 667 (or one of your choosing - if you change the port, adjust the settings in the web site code accordingly).
Testing Single Sign-On
At last, we can open a web browser and navigate to http://localhost:667. You should see the public home page with a link to Sign In. Clicking the Sign In link directs the user to the central single sign-on STS site. Alternatively, navigating directly to the user-protected page http://localhost:667/user also directs the user to the central STS site, but does so via the authorization web.config setting.
Upon logging in, you’ll be redirected back to the relying party web site. This time, you’ll be automatically logged in and have access to the /user page. We’ve successfully completed single sign-on with forms authentication in C# MVC ASP .NET with Windows Identity Foundation and STS.
Troubleshooting Tips
While configuring single sign-on, you may come across a variety of issues or errors, many related to security and permissions. I’ve included some of the more common ones that I’ve experienced while configuring my own setup for enterprise single sign-on.
Error: Keyset does not exist.
Solution: The AppPool user needs permissions to the certificate store (the certificate must be added with a private key, then select the certificate, right-click certificate, select All Tasks, Manage Private Keys) or simply set the user to LocalSystem. Keep in mind the security implications of using LocalSystem for the certificate user, although this usually resolves this error.
Error: The issuer of the security token was not recognized by the IssuerNameRegistry. To accept security tokens from this issuer, configure the IssuerNameRegistry to return a valid name for this issuer.
Solution: Select web.config in Visual Studio, right-click web.config and choose “Open With”, select “Binary Editor”. Look for hidden control characters in the thumbprint. Verify thumbprint is all upper-case characters. Verify name (next to thumbprint) matches certificate issue name “CN=sub.domain.com” in web.config for single sign-on site and client relying party site. It is recommended to re-type the thumbprint manually into the web.config, using all capital letters (do not copy and paste the thumbprint from the certificate properties dialog into the web.config, as this will copy hidden control characters into the web.config thumbprint and cause the above mentioned error).
Error: Key not valid for use in specified state.
Solution: This error is due to the federated cookie being assigned to ‘/‘ on the same domain (probably localhost, during development). This error should go away on different hosted domains. You may also wish to try editing the settings for the client relying party site in IIS, by clicking Advanced Settings and setting LoadUserProfile=true.
Error: No certificate was found for subject Name CN=login.domain.com.
Solution: Use a fully distinguised CN name, including ALL parts: “CN=login.domain.com, O=one, W=two, T=three, Z=four” (no spaces, except one space after each comma).
Helpful Links
There are many bits and pieces of code samples for implementing Windows Identity Foundation and single sign-in in C# MVC ASP .NET with forms authentication. Many are customized instances for specific scenarios. For more details, check out the following helpful pages:
Using Claims-Identity with SimpleMembership in ASP.NET MVC
How To: Build Claims-Aware ASP.NET MVC Web Application Using WIF
Federated Identity with Multiple Partners
Building a simple custom STS using VS2012 & ASP.NET MVC
Download @ GitHub
Source code for the project is available on GitHub.
About the Author
This article was written by Kory Becker, software developer and architect, skilled in a range of technologies, including web application development, machine learning, artificial intelligence, and data science.
Sponsor Me