Introduction
Linquify is a Visual Studio add-in and business class generator for LINQ to SQL and the Entity Framework, providing quick and easy development for ASP .NET data layers.
In this tutorial, we’ll go through the steps of setting up a basic C# ASP .NET web application, which populates a DropDownList control with people from a database table. The user can select a person and click the View button to view additional details about the person, including information from relational tables. We’ll use the Entity Framework as our data access layer, combined with Linquify for our business class type library.
Starting the Project
To begin our C# ASP .NET web application, we’ll create a new web application project in Visual Studio, called “DropDownListLinquify”. Before we get started with the user interface code, let’s put together our data access layer.
Setting Up the Entity Framework Project
We’ll start by creating an Entity Framework class library project, which will be generated from the following database schema:

Notice in the above database, we have 3 tables: Person, Address, and Color. In this tutorial, we’ll only need the Person and Address tables. We’ll be using the PersonId and LastName properties from the Person table within the DropDownList, and we’ll be displaying the City and State properties from the Address table.
Disappearing Foreign Keys in the Entity Framework
Notice in the above Entity Framework database schema, each person references an Address via the AddressId foreign key. Remember, since the Entity Framework in .NET 3.5 uses relationships instead of foreign keys, the above schema is missing the AddressId in the Person table. It’s actually there, but not visible nor directly accessible by the developer. Instead, in the Entity Framework you would access Person.AddressReference.EntityKey or Person.Address to query the AddressId foreign key. Linquify simplifies this for us by providing an AddressId field in the Person business class, which handles the work of mapping to the Person.AddressReference object. You’ll see this in action in the next steps.
Creating the Entity Framework Class Library
We’ll create our Entity Framework class by right-clicking our solution and selecting Add->New Project. Choose Class Library and name the project “DropDownListLinquify.DB”. Delete the Class.cs that is generated automatically, as it will not be needed. Right-click the project and select Add->New Item. Choose “ADO.NET Entity Data Model” and name it Model1.edmx. In the Entity Data Model Wizard, select “Generate from database” and choose your desired database connection and tables. Once complete, you should have the necessary Entity Framework files generated, including Model1.edmx and App.Config inside your DropDownListLinquify.DB project.
Getting Down to Business with Linquify
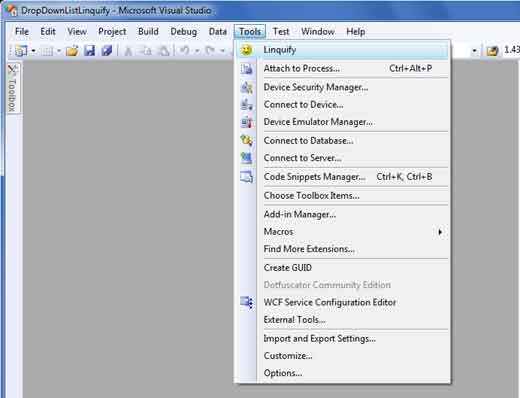
Next, we’ll generate our Linquify business classes from our .NET Entity Framework model. If you have not yet done so, you can download and install Linquify. To run Linquify, select Model1.edmx then in the menu bar click Tools->Linquify.
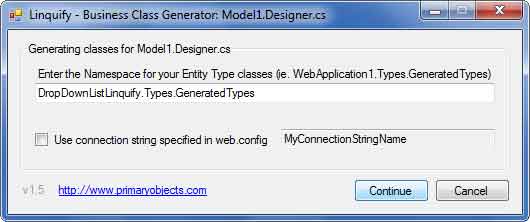
In the Linquify dialog, type in the namespace “DropDownListLinquify.Types.GeneratedTypes”. Remove the checkmark from Use connection string specified in web.config, as we will be using the default Entity Framework connection string (we’ll actually be copying the connection string from the DropDownListLinquify.DB App.config file into our web application project’s web.config file).
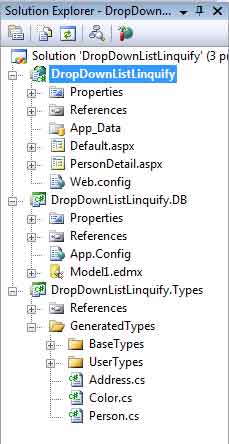
At this point, Linquify will generate a complete set of business classes, providing easy access to the database via the Entity Framework. Your Visual Studio project will look similar to the following:
Extending the Linquify Partial Class for Person
We’ll need to add a small amount of code to include Address within the Person business class in order to grab the City and State information for a particular person. We can do this by extending the Person partial class, generated by Linquify, and added a member to hold the Address information as follows:
1 | public partial class Person |
In the above code, we’ve added a public member for Address. We’ve overridden the OnInitializeComplete() method, which is called when the Person class has completed being loaded or updated from the database. When this occurs, we want to also load the Address object for this Person, which we can do by querying against the Person class’s AddressId foreign key.
We’ve also overridden the OnSave() method, which is called before the Person class has performed an Insert or Update. This allows us to save the Address record first, assign the AddressId (if inserting a new Person), and finally save the Person record.
Our data access layer is now complete and we can move on to the user interface.
Giving the Emperor Some Clothes
We’ll start the user interface by adding our controls to the Default.aspx file and creating the PersonDetail.aspx page.
In the Default.aspx file, add the following code in the main body of the page:
1 | <asp:ScriptManager ID="ScriptManager1" runat="server" ScriptMode="Release"> </asp:ScriptManager> |
In the above code, we’ve added a ScriptManager to the page, along with an UpdatePanel. We may as well take advantage of AJAX to avoid any page refreshes during postbacks. We’ve also added a DropDownList to the page, along with a button to view details. Note, in the DropDownList tag, we’ve defined the DataValueField to pull from PersonId and the DataTextField to pull from LastName. PersonId is our Person table’s primary key, it’s actually a Guid uniqueidentifier. LastName is simply a string and will display as the choices in our drop down.
Populating the DropDownList
In the code-behind file Default.aspx.cs, we’ll populate the DropDownList from our Linquify business class, Person. We’ll also fill out the body for the btnView_Click() event, which will display a popup containing the person’s details.
First, right-click the References folder in the web application project and select Add Reference. Click the Project tab and select the following two libraries:
DropDownListLinquify.DB
DropDownListLinquify.Types
Click Ok to add the references. Right-click the References folder again and select Add Reference. Click the .NET tab and select the following library:
System.Data.Entity
Next, add the following using statement to the top of the Default.aspx.cs file:
1 | using DropDownListLinquify.Types.GeneratedTypes; |
We now have access to our Linquify business class library and can populate the DropDownList with the following code:
1 | protected void Page_Load(object sender, EventArgs e) |
In the above code, we’ve simply instantiated the Linquify Person class. We call person.ToList() to pull all people in the database and bind them directly to the lstPeople DropDownList control. Remember, in the Default.aspx page, we setup the DropDownList to use DataValueField=”PersonId” and DataTextField=”LastName”, which relate directly to properties in the Linquify Person class.
Displaying a Web Browser Popup in ASP .NET
We can fill in the View button click event, as follows:
1 | protected void btnView_Click(object sender, EventArgs e) |
When the user selects a person from the DropDown control and clicks the View button, we’ll display a popup containing detailed information about the person. You could certainly use DHTML, AJAX, a modal dialog, or any number of other way to display this information. However, we’ll keep things retro with a web browser popup.
Remember, our PersonDetail.aspx page will accept a URL parameter of personId (a Guid), which we pass to the page in the javascript popup code. The PersonId value comes from the DropDownList SelectedValue property.
Adding a Details Page
Next, we’ll add a PersonDetail.aspx page. This page will display the details for a particular PersonId. We’ll pass the personId parameter in the URL, so we can access it via the QueryString and display the according person information.
In the PersonDetail.aspx page, add the following code to the main body of the page:
1 | Name: <asp:Label ID="lblName" runat="server" Text=""></asp:Label><br /> |
In the above code, we’ve simply added 3 labels to the page. A label for the full name, age, and address (city, state). There’s nothing too fancy about this, as the real power will come from Linquify as it pulls the data along with the Entity Framework.
An important item to note in the PersonDetail.aspx page is that the lblAddress field will contain a concatenation of the City and State fields from the Address table, which relate to the Person table by the AddressId foreign key.
The code for the PersonDetail.aspx.cs page is very straight-forward, and appears as follows:
1 | protected void Page_Load(object sender, EventArgs e) |
In the above code, we’re simply grabbing the personId from the URL parameter. We cast the string value to a Guid and load the Linquify Person object. Remember, since we extended our Linquify Person partial class to include an Address entity, the moment our person loads, we also load the associated Address. We can then easily populate this data by calling person.Address as shown above.
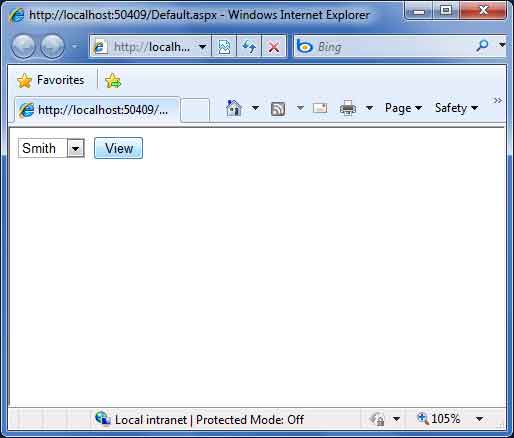
The Fruits of Our Labor
You can download the complete source code for this project here.
We can now run the C# ASP .NET web application and view the results.
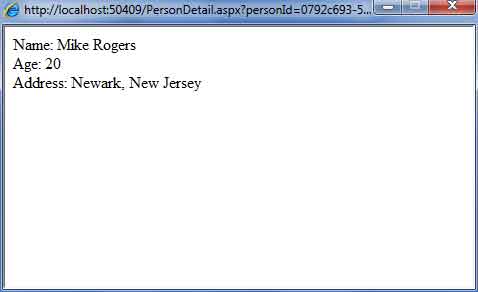
Advantages of Using Linquify with the Entity Framework
Out of the box, the Entity Framework certainly performs all necessary functionality, including create, remove, update, and delete of required database records. The Entity Framework, alone, could have been used as the sole data access layer for our DropDownList C# ASP .NET web application. However, by utilizing Linquify to generate a set of extensible business classes along with the Entity Framework model, we can speed past the (often complicated) development of the data access layer and move almost immediately to the logic portion of the ASP .NET web application. We also gain extensible, session-friendly, business classes, and direct access to foreign keys. Linquify business classes can also be bound to data-bindable .NET controls with ease.
Extending Linquify Business Classes and LINQ
In the above code, we extended the Person partial class to include an Address property. We certainly could have extended the Linquify classes much further. For example, we could have added a property to the Address class to automatically hold the City, State concatenation for us, rather than querying the fields individually. We also could have extended the Person class to combine FirstName and LastName, and even State in the drop-down list display.
While this tutorial skipped using more advanced queries, you can certainly do so in the Linquify partial classes. One example might be to display the list of people with a specific ordering or filter using LINQ. For example:
1 | public partial class Person |
In the above code, we’ve instantiated the Entity Framework data context from our Linquify business class to execute a direct LINQ query. The result is then casted back into a Linquify business class and returned.
Conclusion
In this tutorial, we’ve stepped through creating a basic C# ASP .NET web application, which displays a DropDownList and details page through the usage of Linquify and the Entity Framework. Linquify helped us speed past the development of our data access layer and move directly to web application logic. We were also able to directly reference foreign keys in the Linquify business classes and still take advantage of the power behind the Entity Framework.
Linquify is a C# .NET business class generator for LINQ to SQL and the Entity Framework, helping to support rapid development of .NET and ASP .NET web application data layers. Linquify is free for use under the LGPL.
About the Author
This article was written by Kory Becker, software developer and architect, skilled in a range of technologies, including web application development, machine learning, artificial intelligence, and data science.
Sponsor Me