Introduction
AngularJs is a front-end web framework for creating highly responsive web pages. It works similar to jQuery, with regard to manipulation of elements on the page, but excels at doing so with very little code. It’s particularly handy for creating single page web applications, where multiple views load and display on the same page. This is quite the rave right now, but rightly so.
While AngularJs speeds up the web application’s UI, MongoDb is becoming popular for powering the back-end. This database technology has been growing in use across many enterprise platforms and is becoming the standard for many new companies.
In this tutorial, we’ll review a simple and effective template architecture for creating an ASP .NET MVC 5 C# web application that uses AngularJs and MongoDb. We’ll combine a flexible repository pattern with a REST service-oriented MVC controller to implement a single page web application.
Service-Based Architecture in a Web Application
What exactly is different about creating an ASP .NET MVC 5 C# web application with AngularJs? Traditionally, a developer will create a C# MVC controller that simply calls the database and returns a model to the view. The view then renders the data and everyone is happy.
This static view of data in an MVC .NET web application works perfectly well. However, once the data changes, the model requires a refresh. To do this, the user can either refresh the web browser or navigate to a new page. The MVC controller may then re-fetch the data and return a new model to the view. If you’re already using partial views, you might even be refreshing the data with an AJAX call via jQuery. In either case, the C# MVC controller is being called, which in turn, calls the database layer to refetch the data. This has certain speed implications and may not offer the fastest possible UI response times. This is especially true if the user is left waiting for a response from the server before he can continue using the application.
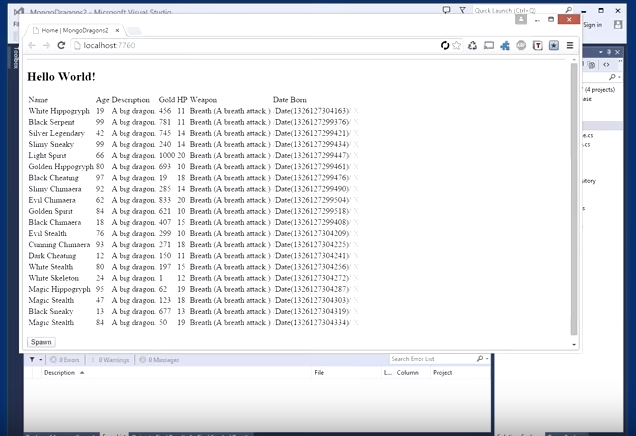
Below is an example of loading data from the controller and rendering the model in the view, using the traditional MVC model/view approach.
HomeController.cs
1 | public ActionResult Index() |
Index.cshtml
1 | IEnumerable<Dragon> |
In the above example, the web browser calls the MVC .NET HomeController, which loads the data, returns the model, and renders the view.
By contrast, AngularJs works a little differently. Instead of rendering a C# MVC .NET model in the view, you can allow AngularJs to call a REST service method in the MVC controller and let the client’s web browser fetch the data to render in the view. This effectively moves the view processing from the server to the client and can give a boost to the UI response time.
Here’s an example of a REST service method, used by an AngularJs view.
HomeController.cs
1 | public ActionResult Index() |
Index.cshtml
home.js
1 | var app = angular.module('homeApplication', []); |
Notice in the above code, we no longer have a C# ASP .NET MVC model type in the view. We also have an empty controller with no model data returned. In the view, we’ve replaced the code referencing the C# MVC 5 model with an AngularJs model instead. Where the MVC version loaded the data by request of the server rendering the page, this service-based version instead loads the data by request of the client web browser. The javascript makes an ajax call upon page load, fetching the data from the REST service method “/service/dragons”. This offers a speedy page load time, since we’re not waiting for the HomeController to initialize. Data can be rendered asynchronously and on-demand.
Let’s take a look at how we can make this work.
The MongoDb Repository Pattern
Let’s start with the back-end repository pattern, using MongoDb.
In a previous article, I had described how to create a MongoDb repository pattern using the Norm MongoDb driver. However, this time we’ll be using the official MongoDb C# .NET driver.
Our repository pattern will consist of a Database class and a Repository class. The database class will handle the actual storage and retrieval of data from persistence. This could be MongoDb, SQL Server, or even just a static array in memory. That’s the beauty of using a strategy design pattern.
Once a database class is implemented, our repository class will instantiate the database and query against it. Time to get to work. First, we’ll need to define the type that we’ll be working with.
1 | public class Dragon |
The above class represents a Dragon object that may be stored in the Mongo database. The dragon contains various fields, such as name, age, description, gold, etc. However, of most importance is the ObjectId property. This represents the MongoDb unique identifier for the document. Since this is a Bson ObjectId type, we can’t easily move this back and forth between the UI’s javascript and the server. So, we’ll also include an IdString property, which simply converts the ObjectId to a string and restores it back. Any time the Dragon class is sent to javascript or posted back, the ObjectId will be maintained.
The IDatabase Interface
Our core interface for implementing different database back-end providers will be defined in an IDatabase interface, as follows:
1 | public interface IDatabase<T> where T : class, new() |
The above interface defines the methods that we’ll require all database provides to implement. This lets us do things like fetch all data, insert items, remove items, query items, etc. You can extend this interface as needed. The key idea is that any database provider can seamlessly be exchanged within your solution, since the repository will be referring to the interface, while the behavior behind it is what changes.
Finally, Our MongoDatabase Class
With our interface defined, we can implement a concrete MongoDatabase class. We’ll simply implement the IDatabase interface and use a generic type so that we can refer to any entity type stored in a collection.
1 | public class MongoDatabase<T> : IDatabase<T> where T : class, new() |
In the above code, notice that the MongoDb connection string is stored in the web.config.
1 | <connectionStrings> |
The MongoRepository Class
Moving right along, we now have a flexible database class defined and it’s now time to implement our repository class. The repository class will contain the business logic that deals with persistence. The method names may be different than the database class and multiple repository classes will probably reference the same database class. Here’s the repository for our Dragon entity:
1 | public static class DragonRepository |
In the above code, notice our private db variable. This refers to the MongoDatabase class and performs the actual persistence. Our other methods can include any business logic they need, while still calling the underlying database methods.
Just For Fun, a Memory Database
So, that’s how you create a generic repository pattern for a Mongo database. Now, for the curious, here’s how you could implement a second concrete database type, usable by your repositories.
1 | public class MemoryDatabase<T> : IDatabase<T> where T : class, new() |
Simply for the exercise, the above code implements a memory-backed IDatabase class. You could use this in exactly the same manner as the MongoDatabase class (assuming all of the methods are implemented, of course), without the repository ever knowing the difference!
So, how can you switch out the MongoDatabase with a different provider, such as the MemoryDatabase? Easy! Just edit the DragonRepository class, in the above example, and change the instantiation of the IDatabase interface, like this:
1 | public static class DragonRepository |
With the above code change, you’ve just replaced the MongoDb back-end provider with a memory backed one that stores data in a List() object. You could even swap it out with MySql database or any provider of your choosing. This really shows the power behind using a design pattern for our architecture.
An Empty Home Controller
Great, our back-end is done. It’s time to put our snappy AngularJs front-end together. Let’s start with a plain HomeController. It’s going to be plain because we won’t have any need to return a model.
1 | public class HomeController : Controller |
That’s it. The controller simply returns a view, with no model data. We’ll have the client’s web browser fetch the model data directly from the view. Let’s see where that happens next.
Our Hero Service Controller
Ok, our HomeController was empty. But, the data has to come from somewhere. We’ll create a ServiceController which implements a REST interface. This REST controller may be called by the client browser to load and manipulate data, on-demand.
1 | public class ServiceController : Controller |
The above code defines three methods. The first operates upon HTTP GET and simply returns the list of dragons in our repository (ie., MongoDb). The second method operates by HTTP POST and inserts a new record into the database. Remember, we’re using a repository pattern, so our methods are not necessarily named Add, Remove, and Delete. In this case, we have a Spawn method that creates a dummy record to save.
What About HTTP Delete?
You may have noticed, in our REST service above, we’re using an HttpPost for our Remove method. It would actually be more concise to use the HttpDelete method instead. By default, C# ASP .NET MVC 5 does not include support for the HTTP DELETE protocol. We would need to add some configuration changes to the web.config in order to enable it.
web.config
1 | <system.webServer> |
In addition, AngularJs also requires a small tweak to enable the HttpDelete protocol.
1 | $http({ method: 'DELETE', url: '/service/remove?id=' + dragon.IdString }).success(...); |
The protocol ‘DELETE’ needs to be explicitly provided in the AngularJs http call. We also have to pass the entity Id value in the url query string. Since we’re changing the value passed from being a Dragon entity to being an Id, we’ll need to tweak the MVC controller definition too.
1 | [HttpDelete] |
In short, due to the subtleties required to enable HTTP DELETE, it may be safer to just stick with GET and POST for your needs.
Careful With ObjectIds
In the above REST service controller, the third method is an HTTP POST to remove a record. Notice, it takes a parameter of Dragon, to indicate the record to be removed. AngularJs will actually pass us this object via JSON from the javascript. Remember that ObjectId and IdString property in the Dragon class? That will come in handy here during the serialization, as it maintains the ObjectId value from client to server and vice-versa.
Rendering a View
We’re almost there! Let’s put together the C# ASP .NET MVC 5 Razor view page to actually render the data with AngularJs. Here’s what it looks like:
Index.cshtml
I highly recommend reading an AngularJs tutorial so you have a better idea of how to use the technology. In any case, here is what the above view code does.
We define a main div for our AngularJs application. We also provide a controller. This helps to separate view controller code, in javascript, from the actual HTML.
We define a simple table in the HTML. The key is in the tbody element, where we use an AngularJs repeat method. This loops through all objects in the data to render the javascript objects. The curly braces define AngularJs properties of the javascript object.
We also have some AngularJs click events defined on the remove buttons and spawn button.
You can easily see how the data is rendered. But, where exactly is the data coming from?
The AngularJs Home Controller
Here is where the neat stuff happens that ties our whole architecture together. Remember, we previously created a REST service controller in MVC 5 ASP .NET that we can call to fetch data. The controller, in turn, calls our repository, which calls the database. We’re going to call that REST interface from the client’s web browser to fetch data for our view.
You might have noticed the little script tag in the Index.cshtml code above, which loads home.js. That’s where the AngularJs controller code lives. Let’s see what it looks like.
1 | var app = angular.module('homeApplication', []); |
The above javascript code defines our AngularJs view controller. Upon page load, we make an HTTP GET call to /service/dragons, which calls our REST service controller to return the list of dragons as a JSON array. The data gets stored in the “dragons” variable and is now available to our page for rendering. This is how we’re able to “repeat” across the array and render the table rows.
Likewise, we’ve defined the spawn and remove methods in javascript. These two methods are called upon the Angular Js button click events that we defined in the view. The methods make HTTP POST ajax calls to /service/spawn and /service/remove, respectively. Our REST interface calls our repository, which calls the database, and we’re done!
Download @ GitHub
You can download the project source code on GitHub by visiting the project home page.
About the Author
This article was written by Kory Becker, software developer and architect, skilled in a range of technologies, including web application development, machine learning, artificial intelligence, and data science.
Sponsor Me