Introduction
Are you ready to build a voice-based game for the Amazon Echo?
I’ve recently published and released my first book, “Building Voice-Enabled Apps with Alexa“, which covers everything you need to know about building voice-based apps with Amazon Alexa. In addition to step-by-step tutorials for creating your first Alexa app, it contains a fascinating background of conversational UI, covering both the history and future of voice-based artificial intelligence software technologies. I’ve been working diligently on this book over the last quarter of 2016, and am truly excited to have finally released my first book! If you’re interested in the topic of voice-based software or chatbots, I certainly recommend taking a peek.
With that in mind, let’s take a look at how to build your own voice-based game with the Amazon Alexa platform.
Amazon Alexa is a popular platform for developing voice-based software applications for the Amazon Echo and voice-enabled devices. Building voice-controlled conversational apps allows you to develop software in an entirely new way. You can interact with users in a much more intimate and human-like fashion. Unlike traditional graphical user interfaces, such as web pages and PC-based desktop applications, voice-based software can be controlled and navigated in much the same way as holding a conversation with a friend.
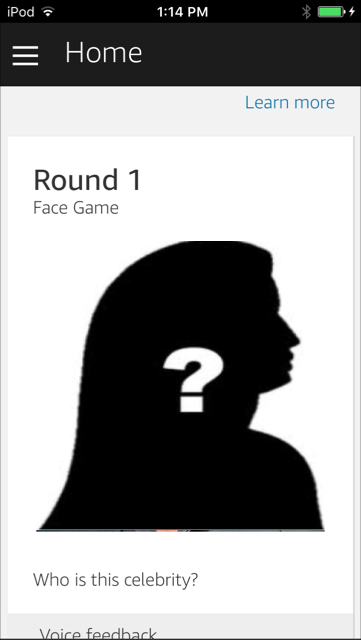
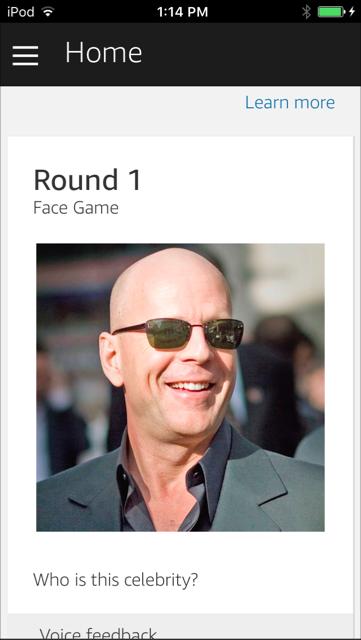
In this tutorial we’ll walk through the steps to create a game skill with Amazon Alexa. The skill that we’ll develop will be a celebrity guessing game. The user will be presented with an image of a celebrity. They will have to guess the celebrity’s name to earn points. The amount of points earned will depend on how fast the player correctly names the celebrity. Celebrity data will be retrieved from an external API. We’ll display an image of the celebrity using an Amazon Alexa Home Card, which displays the picture in the Alexa mobile app.
Below is an example screenshot of the Amazon Alexa home card which is part of the game, displaying on a mobile device.
Designing the Game
Let’s begin by describing the overall game-play for our voice-based celebrity name guessing game.
First, we’ll utilize an external API service that will allow us to retrieve celebrity data. The data will contain the name of a celebrity and a URL to an image. While building the API itself is not included in this tutorial, you can easily integrate your Alexa skill with any type of external API or service for reading data and controlling it by voice.
To keep things simple, our game will be designed for a single player. At each round, the player will be presented with an image of a celebrity via a home card in the Alexa app. They’ll be asked to guess the name of the celebrity and will earn points depending on how quickly the correct answer is given. At any point in the game, the player can ask for their score, help, or to quit. Simple enough!
The image will be presented on an Amazon Alexa home card on the player’s mobile device. Home cards are displayed in the Amazon Alexa App, and allow you to show text and images in the context of a voice-based app.
Note, for advanced versions of the game, the face within the image that is presented to the user will be blurred. Blurring can be done with a third-party machine learning API service that can identify the facial boundaries, upon which we can apply a filter to. Of course, this is beyond the scope of this tutorial, but it gives you an idea of the flexibility you can have while building voice-based apps. Machine learning API services are discussed in more detail in Chapter 5 * =)
Outlining the Conversation
The first step in designing a voice-based app for Amazon Alexa is to determine the flow of conversation. This can most easily be done by creating a simple text script, covering an example conversation with the player. Below is an example of the player interacting with our game.
1 | Alexa, ask facegame to start |
As you can see in the above conversation outline, the player is guided through the steps of the game. At each step, the player is prompted either to begin the next round or to name the celebrity. We specifically have the player answer by first saying, “The answer is”, followed by the name of the celebrity. This allows us to isolate the “celebrity” intent, for checking a player’s answer. If we simply listened for any wildcard response that the player (or others in the room) might say, it would be more difficult to correctly trigger the desired intent. By specifying a certain phrase, we’re able to narrow down which intents are triggered at the right time.
It’s also important to keep in mind that at the end of each response by Alexa, the user is prompted with a question. This is a requirement for Alexa skills that keep a session alive and active with the user. Since our game will retain an active session across multiple rounds and interactions with Alexa, we always respond to the user with a question, effectively prompting for their next response.
Drafting a text conversation is a great way to get started with developing a skill. With the basic conversation in hand, we can move on to the next step, which is designing our voice user interface diagram.
The Voice User Interface Diagram
A voice user interface diagram (VUI) shows the path and flow of our voice-based app conversation in a similar way as the text example above. However, the VUI also includes more technical interactions, such as specific intents, actions, session variable changes, and calls to external APIs. The VUI really sets up the technical flow for our voice-based app and make it easier when determining which intents and utterances to include in your Amazon Alexa skill.
Below is a VUI diagram for our celebrity face guessing game.
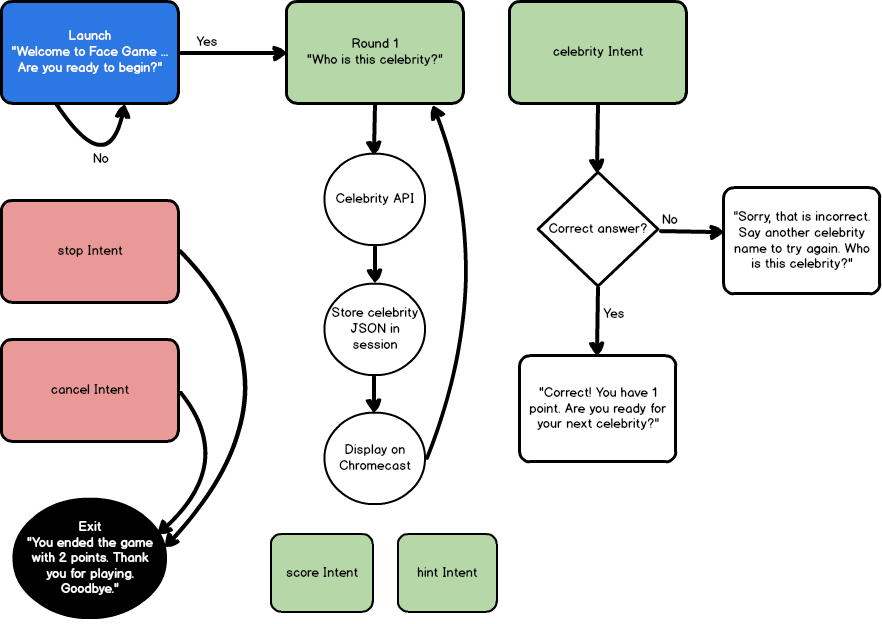
As you can see, the diagram outlines the various Alexa skill intents that we’ll be creating. These include intents for launching the game, beginning a round, naming the celebrity, asking for a score, asking for a hint, and exiting the skill.
Upon initial launch of our skill, our launch method will execute. This method provides a welcome message to the user with instructions for playing the game. The player will be prompted before actually starting the game, in order to give them time to prepare. This is especially important, since points are earned depending on how fast the correct answer is given!
After launching, when the user responds with a positive affirmation (“yes”, “ok”, etc) to begin the game, the state of the game will move to the first round and ask the player to name the celebrity.
It’s at this point that an external celebrity API will be called to retrieve celebrity data in the form of JSON. We’ll store the JSON response within the Alexa session and display the image url, provided within the JSON, on an Alexa home card. We’ll also store the date and time of the round starting, so we can track how fast the user answers. The state of our skill will now expect the user to provide the name of a celebrity.
The celebrity intent will handle receiving answers from the player in the form of, “The answer is”, followed by the celebrity name. As mentioned above, we require the user to say “The answer is” so that we can identify the request as being specifically for providing an answer, and thus, triggering our “celebrity” intent. We’ll also be using a fixed set of celebrity names, which will allow us to further tie this intent to just those utterances within the list of available celebrities. Amazon Alexa allows you to upload this list to their service to help with identifying which intent to call and to aid in voice recognition accuracy.
We’ve also included some additional intents and navigation paths for retrieving the score and obtaining a hint for the current round. Both intents will require examining the Alexa session object, in order to report on the player’s score and current game state.
There is a lot more detail behind handling the Alexa session and state transitions, as discussed in the book, but we’ll keep this simple for the tutorial.
Let’s get started with writing some code!
Setting Up the Framework with Alexa-App and Chatskills
We’ll be using alexa-app as our framework for creating the Alexa voice-based skill. This framework makes it very easy to develop a fully functional skill with limited overhead.
In addition, we’ll be using the chatskills library to allow us to easily debug our skill as a text chatbot, running in the console. This will allows us to test our skill locally, through a simple text chatbot interface, before actually publishing to the Alexa service. In this manner, we won’t require an actual Echo (or even a simulator) to start running and testing our skill. We can do it all from the console!
Creating a package.json
The first step for building an Alexa skill is to create a folder to hold your files. We’ll simply call this facegame.
Within the folder, create a new file named package.json to define the node.js libraries that we’ll use for our project. The contents of this file should appear, as shown below.
1 | { |
Open a console prompt in the folder and run the command npm install to install all required libraries from the package.json file. Now, we can begin writing our skill!
A Skeleton for Our Alexa Game
Create a new file named index.js, which will hold our definitions for Alexa intents. Intents are the core methods that run our skill.
Inside the file, add the following code to the top.
1 | var alexa = require('alexa-app'); |
This simply defines the libraries that we’re using to develop our skill. Specifically, we’re using chatskills as the host environment for debugging, and alexa-app as the deploy environment once we’re ready to publish. Notice that we’ve commented out the line for alexa.app, since we’ll be using chatskills for a text chatbot interface for now. Once we’re ready to publish to the Alexa service, we can reverse the comment to enable alexa.app and comment out chatskills.
Let’s define our launch intent next. The launch intent is the method that runs when the skill is initially invoked by the user. You can use this to initialize session variables, say a welcome message, and perform any other initialization work before your skill is fully running.
1 | app.launch(function(req,res) { |
In our launch method, we’re going to initialize some game state variables and say a welcome message to the player, informing them of how to play the game. Of course, you’ll notice the text and details of this are not apparent in the above code. This is because we’re going to be using an abstraction pattern to move implementation details out of our intents and into a helper method instead. In this manner, all text phrases that the skill speaks can be found in a single location. In addition, state transitions can also be maintained in a single location. As a final bonus with this pattern, management of the request, response, and session are handled smoothly via a context object.
Let’s take a closer look at this pattern before we dig into the other intents.
The Context Pattern
As mentioned above, we’re using a context pattern to handle the methods within our intents. This design allows for a context object, which contains all of our session variables within a single object. It also allows us to pass a single context object to other methods, which can manipulate values and state within the context, before finally passing the updated context back to the intent, which is then saved to the Alexa session.
The pattern looks generally like this:
1 | // Get current context. |
The first line of this pattern retrieves the context from the Alexa session. Note, the session is a JSON object that is passed back and forth between the Alexa service and your own skill’s endpoint. It is maintained in a very similar way to traditional web applications (i.e., session state, etc). We retrieve the session and context object from the Alexa request.
Once we’ve retrieved (or initialized) the context, we set the action for the current intent. This tells the helper methods what the current intent being executed is.
After setting the action for the current intent, we call a helper method to get the response message that we’ll speak to the user. Internally, the helper method will update the skill’s state on our context object. This is how we handle state transitions in an Alexa skill.
Keep in mind, Alexa skills (especially games) are usually modeled after a state machine, which can be expressed in a state transition diagram. As the player executes intents within the skill, they transition the game (or app) state, to call subsequent methods and intents. We’ll handle this state transition within a helper method to organize our code into a single location. We’ll see this in just a bit.
After obtaining the current state, we get a response message from a helper method. The helper method examines the current state and sets a “message” and “repromptMessage” value on the context object, specific to the current state. This makes it easy to keep all of our responses in a single location.
Finally, we save the context back into the response session and speak the message to the player.
State Transition Design
Let’s take a closer look at how the state transition is handled in our game, since that is the first helper method that gets called within our intents.
We’ll start by defining a commonManager class. Within this class, we’ll define an enum object that will define our game states. We have 8 game states (including the initial launch), as defined below.
1 | var commonManager = { |
With the enum defined, we can now create a method for determining the current state, given a context.
Finding the Current Game State
Since we’re using a state transition pattern for our game, we’ll need a method that takes a context, examines the action for the intent, and determines what the current state of the game is. We can do this with a simple javascript enum object and a series of checks on the action and session values.
Below is the method that returns the current game state.
1 | state: function(context) { |
The first item to note is that we initialize the score and round on the context object, if it has not yet been set. This is especially important for our launch intent, which is when the player first invokes our skill.
The remainder of the code simply checks the current action being executed, along with any specific state values, and returns the current state. You can see how we can transition through a state machine in this manner, by simply updating the action within each intent and manipulating the game state variables.
Responding to the Player
Now that we’ve determined the current state of the game, we can select an appropriate response message to say to the player. Since voice is the primary interaction with the user, it’s important to organize responses in a common location that is easily maintainable and accessible. Below is the method for determining the response and updating the context.
1 | prompt: function(context) { |
As you can see in the above code, the method basically consists of a switch statement. We first obtain the current context.state value and then populate the context.message and context.repromptMessage accordingly. When we return the updated context back to the intent, we’ll simply speak the message value back to the player.
Many of the cases within the switch statement simply return a text message. However, some also perform logic and even update the state. For example, the CHECKGUESS case is where we compare the player’s answer with the celebrity’s name to determine if the player has scored points. When a correct answer is given, we update the player’s score, clear out the celebrity session object, and say a response message to the player.
This can be a convenient pattern for managing responses and maintaining a skill.
Creating the Celebrity Intent
Now that we’ve seen how state is being managed within our Amazon Alexa skill game, let’s define the other intents for our game. So far, we’ve defined the launch intent. Next, let’s define the celebrity intent.
The celebrity intent will read the name provided by the player and check if a correct answer is given. If so, the player will win points and proceed to the next round. The code for this intent is shown below.
1 | app.intent('celebrity', { |
The first notable part of this intent is the utterances definition. This is where we define which keywords and phrases, spoken by the user, will invoke this intent. We’ll providing several different forms of speech that the user can utilize when providing an answer. By utilizing the alexa-app syntax for utterances, we can generate a large variety of utterances from a simple string of keywords and phrases. Our intent’s utterance syntax expands to include the following phrases shown below.
1 | celebrity the answer is {CelebrityOne} |
When the player speaks any of the above utterance phrases, the celebrity intent will be invoked.
The next item to note in the celebrity intent is that we’re using the context pattern to handle state transition and response prompts, just as we’ve described above. In addition, we’re reading from two slot variables to get the celebrity first and last name, as spoken by the user. We concatenate the two values together to form our guess, which is then updated on our context object, and then analyzed by our state and prompt helper methods (which actually determine if a correct answer was supplied).
You can see how our intent code is quite simplified by having the core state transition logic handled by our helper methods.
Handling Yes and No for Multiple States
Our next intent will be the “yes/no” intent. Our game uses this phrase in two specific locations. The first is at the beginning of the game, before starting the first round. After speaking our launch message, we want to give the player time to get ready before starting the game. We can do this by asking them, “Are you ready to begin?”. At this point, the player can speak “yes” when they are ready to proceed.
The second location where a “yes/no” response is required is in between rounds. When the player completes a round, and before starting the next one, we again want to provide the player with time to get ready. We’ll ask the user, just as before, “Are you ready for your next celebrity?”.
Since we’re using this intent for multiple states, we’ll need to check the state and update the response according to the current action.
The code for the “yes/no” intent is shown below.
1 | app.intent('yesNo', { |
Yes/No Utterances
The first important part of this intent is the utterances definition. We’re using a defined slot type for this intent, since we want to restrict the phrases that trigger this intent to a very specific list. We’ll provide this list to the Alexa service as a slot type so that it can fine-tune voice recognition.
Our list of values will include the following:
1 | yes |
We’ll also include this list of values in our game, as a dictionary, so that we can determine when the user indicates a “yes” versus a “no” response. The collection of “yes” terms are shown below.
1 | var yesTerms = ['yes', 'ok', 'sure', 'affirmative', "let's go", 'lets go', 'start', 'continue']; |
Since we’re using a slot type, we’ll be able to access the “yes” or “no” state of the player’s response. You can see this when we dynamically populate the context.action value at the top of the intent.
1 | context.action = (yesTerms.indexOf(req.slot('Confirm').toLowerCase()) != -1) ? 'YES' : 'NO'; |
Specifically, the above line of code checks the slot value, as spoken by the user, and matches it against the list of yesTerms. We can then indicate the action of this intent as “YES” or “NO”, which can then be used when determining the game state.
Advancing the Game Round and Loading Celebrities
The next part of the code checks if the intent is being executed within the context of a game round. If so, we increment the current game round (initially set to 0) and load a new celebrity by calling our external API service. We’ll store the JSON returned from the API as a property on our context object, which gets saved in the session. This is how we can track which celebrity the player is trying to guess.
Notice, one of the properties on our celebrity object is the URL to the picture of the celebrity. We’ll need a way to show this, and an Alexa Home Card is the preferred way.
Displaying an Image on an Alexa Home Card
Alexa home cards are screens of information which display within the Amazon Alexa app on a mobile device. On the home screen of the Amazon Alexa app, home cards can be viewed for almost every skill that has been executed on the Amazon Echo or Alexa-supported devices.
In addition to the generic cards that display for each user query to the Alexa service, you can manually display cards from your skill as well. This is exactly what we’ll do to display the celebrity image to the player.
Displaying a home card can be done by simply calling the res.card() method and providing a JSON object, containing the designated card content. Our intent displays an Alexa home card image with the following code, shown below.
1 | // Show home card in Alexa app. |
The above code defines the type of home card as “Standard”, and provides a title, text, and image value. Images must be hosted on an SSL HTTPS url. This call will result in adding the following block of JSON to the Alexa service response, which is then used by the Alexa service to update the home card on the Alexa app and speak a response to the user.
The JSON fragment, generated for an Amazon Alexa home card, is shown below.
1 | "card": { |
The Alexa service uses the above fragment, from our endpoint service response, to display a home card in the Alexa app.
After updating the celebrity and displaying the home card image, we can record the current time (used for scoring how quickly the user guesses the correct answer) and then say the response to the player.
Implementing Built-in Intents
We’ve only defined three main intents, the launch, celebrity, and yesNo intents. These comprise the core functionality for our entire game!
In addition to these custom intents, we can implement a few built-in Amazon Alexa intents, just to make our game more complete. Specifically, we’re going to implement the AMAZON.NextIntent to allow the player to skip a round if they have trouble guessing the celebrity. We’ll also implement the AMAZON.StartOver intent for re-starting the game.
We’ll also implement two important built-in intents that all skills should have, which include the AMAZON.StopIntent and AMAZON.CancelIntent for exiting the skill. These intents are included as part of Amazon’s standard built-in intent library.
Since we’re using the context pattern, implementing these intents is relatively straight-forward. Let’s take a look at the AMAZON.NextIntent first.
Skipping a Round in the Game
When the user wants to skip the current celebrity and try guessing a new one, they can say phrases such as, “skip” or “next”. This is defined and handled by the AMAZON.NextIntent. We can implement this built-in intent with the following code shown below.
1 | app.intent('AMAZON.NextIntent', { |
Notice, just as with our other intents, we’re using the context pattern to take the current action of SKIP, update the current game state, and then say a response back to the user. In addition, we have an extra line of code for clearing out the current celebrity object, stored in the session. This is what affects the determination of game state and will allow our state transition helper to start a new round.
Starting the Skill Over
When the player wants to reset the game and start over, they can issue a request such as, “start over”. This is handled by the built-in intent AMAZON.StartOverIntent. The code for this intent is shown below.
1 | app.intent('AMAZON.StartOverIntent', { |
Just as we used with the AMAZON.NextIntent, we allow the context pattern to determine the state and provide a response to the player. We set our context.action to LAUNCH, which is what our game uses as the initial state. Likewise, our state transition helper will determine this to be a game reset and speak the welcome message to the user.
In addition to the context pattern boilerplate code, we have one additional line of code for resetting the session variables for celebrity, round, and score to null. These will be re-initialized to 0 in the commonManager.state() helper method, just as we’ve done when starting the game.
Exiting the Skill
The final two built-in intents are for exiting and quitting the skill. These include the AMAZON.StopIntent and AMAZON.CancelIntent. It’s important to always define these two built-in intents for every skill that you create, as they provide a common means for the user to quit your skill and go back to the main menu on the Amazon Echo or Alexa-supported device.
In most cases, both of these built-in intents should perform the same action and contain the same code. Amazon recommends that developers keep the functionality the same for both stopping and cancelling your skill, as this is what most users typically expect when speaking these phrases.
Since both intents will be implemented with the same code, we’ll just show one of the definitions below.
1 | app.intent('AMAZON.StopIntent', { |
This should look very familiar now, as we’re again using the context pattern to handle determining the current state and providing a response message back to the user. We set the context.action value to QUIT, which is then handled by the commonManager.prompt() helper method for returning a “goodbye” response to the player.
Don’t Forget to Terminate The Session
You may have noticed one difference in our Stop and Cancel intents is that the final line of the intent makes a call to shouldEndSession(true).
Up until this point, all of our other intents ended their code by calling shouldEndSession(false). This tells Alexa to keep the existing session open, as the player is in the middle of playing the game. We want to retain all session values and keep the existing context through each subsequent call and execution of intents within our skill.
When you set this property in an intent, it updates the JSON response that is returned to the Alexa service by setting the shouldEndSession value to true or false. In the case of exiting the skill, we want to set this value to true, to terminate the session and exit the game.
Running Our Alexa Skill as a Text Chatbot in the Console
Now that our game is ready, we can debug it in the console by using a simple text chatbot interface. This can be done with the help of the chatskills library that we’ve defined at the top of our index.js file.
To set up the text chatbot interface, include the following code at the bottom of your index.js file.
1 | module.exports = app; |
In the above code, we include a call to chatskills.launch(app) which tells chatskills to execute our launch intent when the chatbot first runs. This will display the welcome message to the player in the console.
Next, we have a simple while loop that prompts the user for text and processes the response from the matching intent. Instead of speaking a request to an Amazon Echo device for debugging, you can directly debug your Alexa skill in the console. How convenient!
Below is an example of our game running in the console.
1 | C:\Users\guest\Desktop\alexa-app-server\examples\apps\facegame>node index |
As you can see, we can directly interact with our Alexa skill right from the console. It’s just like talking to a chatbot! This makes it very quick and easy to debug your skill, prior to deploying it to the Alexa service.
Once you’re satisfied that your skill is working correctly, the next step is to switch your skill to use alexa-app and test the endpoint in the browser.
Running Our Skill in the Browser with Alexa-App-Server
After testing the skill as a chatbot in the console, the next step is to test the requests and responses in the browser. We can do this by disabling chatskills and enabling alexa-app, which sets us up for publishing to the Alexa service.
To enable alexa-app, simply change the following lines in the index.js file, as shown below.
1 | /*var chatskills = require('chatskills'); |
Simply comment out the libraries for chatskills and readlineSync, which are only required for using chatskills. Also, uncomment the definition of the app as a new alexa.app() and comment out the line for chatskills.app().
Finally, comment out the block of code at the bottom of your index.js file that handles prompting the user for input on the console, as shown below.
1 | /*chatskills.launch(app); |
With the above changes, you can now use the alexa-app-server library to host your skill in the browser and test the request and response JSON fragments that the Alexa service will receive.
In addition, you can also publish your skill and then test it on an Echo simulator, in the Alexa developer web site, and on a physical Echo device.
Since the details for debugging and testing an Alexa skill on these various platforms can require an entire article of it’s own, I’ll leave these details for another tutorial.
Of course, you can always find them in my book, “Building Voice-Based Apps with Alexa“!
About the Author
This article was written by Kory Becker, software developer and architect, skilled in a range of technologies, including web application development, artificial intelligence, machine learning, and data science.
Sponsor Me