Ready to build your first web app with React? React is a javascript library, developed by Facebook, that has been gaining in popularity. It uses a component-based UI development style, combined with simplicity, and optimized performance. React is similar in nature to jQuery, in that they can both be used as UI libraries. Unlike larger web UI frameworks, such as Google’s AngularJs, that can serve as a much larger package and complete UI framework, Reactjs excels at focusing on being a specialized UI view library. One of its biggest benefits is at rendering complex user interfaces with optimized performance. UI components built with React can also be re-used and even shared across projects.
In this tutorial, we’ll walk-through building a simple javascript web app with React. We’ll create a dragon generator (because, who doesn’t love dragons, right?), consisting of a form, a submit button, a small remote database, and real-time output. We’ll tie all of our logic together into a javascript React app, using node.js. Finally, we’ll run a build to produce the final performance-optimized output files that can be uploaded directly to your web server.
Let’s get started!
React Tutorial Demo App
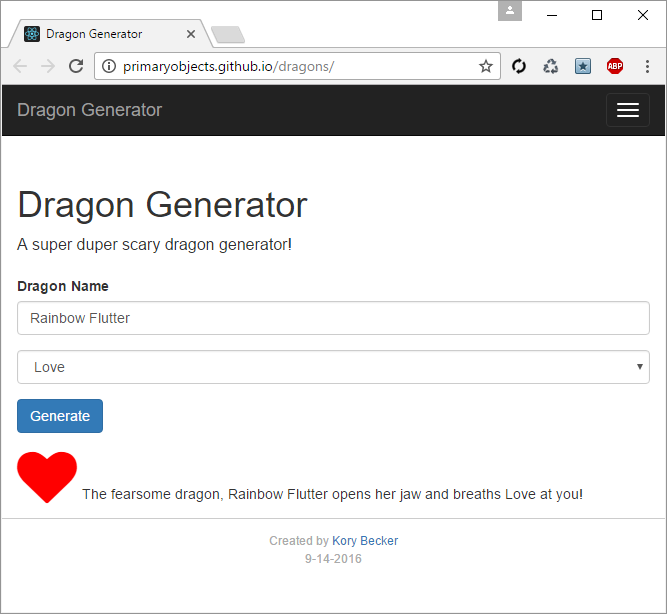
Everyone wants to see the final demo, before we dive into the code, right? You can view the react javascript dragon generator demo here.
Installing React for Node.js
Since we’ll be using node.js to create our react app, let’s begin by installing react in our environment. We’ll use the create-react-app framework in node.js.
Use the following command in your console to install the react framework for node:
1
npm install -g create-react-app
Next, we can create a template project with the following command:
1
create-react-app dragons
You should now have a folder named “dragons”, containing a template project for the react app. You can try running the template project by entering the following command:
1
npm start
This should launch a web server and open your web browser to the project url on localhost, port 3000. You can view the url in your browser to see the default React project template. Let’s design our form.
Setting Up a Web Template with Twitter Bootstrap
Let’s begin the code for our front-end web development by using a simple Twitter Bootstrap template. We’ll need a couple of CDN libraries to give our app a nice appearance, including both the Twitter Bootstrap and Font-Awesome libraries. Start by editing the file index.html and adding the following code inside the head section.
While we’re at it, let’s update the title for our page. This can easily be done by editing the title tag within the head section:
1
<title>Dragon Generator</title>
Notice, the body of our page contains a single div element with the id “root”. This is a placeholder container for React to render HTML and UI components within. You can add any necessary HTML within the body, such as for a web template, and include specific div elements for React to render within.
For our purposes, let’s delete the div “root” and replace it with our own HTML template code. Don’t worry, we’ll add back in the React container element, later on in the tutorial. We can add the following into the body section.
Save the index.html and reload the page in the web browser. You should now see a simple Twitter Bootstrap web UI template. The text along the top of the page is probably cut off, so we’ll need to add our first CSS style.
Adding CSS
Move into the /src folder and edit the file index.css. Add the following code into the end of the CSS file.
1
2
3
.starter-template { margin-top: 50px; }
This just gives our main container a little margin so that the full text will display. Save the file and reload the browser to see the changes. Next, let’s add a form!
Adding a Form
To add our HTML for the dragon generator form, modify index.html., just inside the div with the class “container” and after the div named “starter-template”, by adding the following code:
Save index.html and reload the page. You should see our app now has a basic web form. We’re making progress! Let’s move on to wiring up our React app, so that it can receive the form submission and respond with output.
Creating a React Component for our Form
It’s time to start creating our main React app component. React renders HTML from within a component and responds to events, such as mouse movemenets, keyboard events, and form submissions. Similar to jQuery, you can attach to events, with the key difference being that you now have Javascript context within the component. In this way, you can manage data about the component and manipulate properties of the associated web page elements.
Since we want our form (and output) to be controlled by React, we’ll need to move the HTML from our web page index.html into the React component file App.js.
Edit the file index.html and replace the entire block of code for the HTML form element, with an empty div, containing the id “root”. You can find the form code that we’ll be removing in the example code block above (the form element is between the two div tags).
Cut the form HTML code (we’ll be using this later, inside our React component) and replace it in index.html, just after <div class="col-sm-10">, with the following:
1
<divid="root"></div>
The empty div, shown above, will serve as a container for React to render our component within. If you reload the web page, you should see the “Welcome to React” component rendering under our web page header! You might be wondering where that HTML is coming from, since it’s not included within the index.html. We’re about to answer that question, by implementing the reactjs render method.
Rendering HTML in a React Component
Taking the HTML for our form, that we just removed from the index.html file, edit the file App.js and paste the HTML within the render() method, as follows:
The above HTML in our React component is actually called JSX. It’s technically a preprocessor step that adds XML syntax to JavaScript.
There are a couple of tweaks needed within the HTML, to make it compatible as JSX. Specifically, we need to replace all occurrences of class="" with className="". This is because “class” is a special keyword in javascript, so React uses className instead. In addition, we need to replace for="" with htmlFor="" for similar reasons. Your final code should appear, as shown in the example above.
If you reload the web page, you should no longer see the React welcome header, and should now see our form rendering back on the page. We are now officially rendering the form contents from our React component.
Binding to our Form Controls
Now that we’re rendering the form from React, we can begin binding the input fields to our component. This will allow us to collect the data entered by the user and process the output (generating a dragon name).
The first step, is to add a value for our Name input element. We can do this by modifying the HTML in our React component, on the first input element, and adding the property “value”.
The above code has two changes. First, we’ve added a value attribute, binding to a variable (this.state.name) in our component’s state context. This variable will store the contents of what the user enters. We’ve also added an onChange event, which will update the state variable as the user types.
We’ll need to add some associated code for supporting our Name variable. We can do this with the following:
The above code binds the form textbox to a variable in our component. We can now access the value typed in by the user at any point within our component. For example, to display the value of Name on the Javascript console, we could do the following:
If you add the above and reload the page, then open the Chrome Inspector (or web browser debugger window), you can see the value output to the debugger console as you type text into the textbox.
Let’s do the same thing for the breath dropdown control. Modify the HTML for the select element, as follows:
We now have both form fields bound to our component. Let’s wire up the “Generate” button, so we can build our output.
Handling a Form Submit in React
At this point, our form input fields are binding to our React component, so we have their values in memory. We can now handle the form submit click event and render the output from our form. To do this, simply add an onClick event handler to the submit button, as follows:
Then add the associated event handler code. First, bind the “this” command within the constructor for the click event:
1
this.click = this.click.bind(this);
Next, add the click event handler code:
1 2 3 4 5 6 7
click(e) { if (this.state.name && this.state.breath) { console.log('The fearsome dragon, ' + this.state.name + ' opens his jaw and breaths ' + this.state.breath + ' at you!'); }
e.preventDefault(); };
Reload the page. Now, enter a value for “Dragon Name” and choose an option for the breath attack. When you click the “Generate” button, you should see a sentence output in your web browser debugger window.
Next, let’s show the output in the web page.
Rendering Dynamic Output in ReactJs
To display our output, we’ll need another div to hold the contents of our result. We can add this new div just below our form tag, inside our React javascript component. If you simply add another div, you’ll get an error from React, saying “Parsing error: Adjacent JSX elements must be wrapped in an enclosing tag.”. To correct this, simply add a parent container div around the form tag, and our new output tag, as follows:
Notice, we have a new “root-container” div encompassing the component’s render block. We’ve also added an output div at the bottom of the block, displaying as its text, our variable for “result”.
Notice, our output div contains a dynamic CSS className attribute. We can check the value of our “result” variable, which gets populated after the user clicks the “Generate” button, to tell whether we should show or hide the output block. If the result variable is empty, then the user hasn’t clicked the Generate button yet. Therefore, we hide the output div. If the result variable has a value, then we know the user has already submitted the form, so we show the output div.
Regarding conditionally displaying the output div, since our div is invisible anyway, other than its text, it might seem unnecessary to do this. Afterall, we simply display the result text inside the div, after the user submits the form. However, this will actually become more important in the next part, where we add some other styling to the output, depending on the type of dragon created.
We can now modify our click event handler to populate the result variable and automatically update our output.
1 2 3 4 5 6 7
click(e) { if (this.state.name && this.state.breath) { this.setState({ result: 'The fearsome dragon, ' + this.state.name + ' opens his jaw and breaths ' + this.state.breath + ' at you!' }); }
e.preventDefault(); };
Save and reload the page. Enter a name for the dragon and select an option for breath attack. Click the “Generate” button and you should now see text output below the form, containing the result of our component!
By the way, the command e.preventDefault() stops the form submission from reloading the page. This provides a smoother user experience.
Adding Dynamic CSS Classes in React
To make our project a little more interesting, let’s add a dynamic CSS class on the output to show a different icon for each dragon’s selected breath type. To do this, add a font-awesome icon inside the output div, as follows:
1 2 3 4 5 6 7 8 9 10 11 12 13 14 15 16
<div id="output" className={this.state.result ? '' : 'hidden'}> <iclassName={'fa ' + (() => { switch(this.state.breath) { case 'Fire': return 'fa-fire'; case 'Lightning': return 'fa-bolt'; case 'Poison': return 'fa-flask'; case 'Water': return 'fa-tint'; case 'Ice': return 'fa-cubes'; case 'Undead': return 'fa-blind'; case 'Death': return 'fa-hotel'; case 'Love': return 'fa-heart'; default: return 'fa-crosshairs'; } })()}></i> { this.state.result } </div>
In the above code, we’ve added an icon element, along with a React JSX javascript switch statement to select an icon for the dragon’s breath attack. A switch statement like this can be used to conditionally change the class on an element.
Go ahead and save App.js. Then reload the web page. You can now enter a name for the dragon, select a breath attack, and click Generate. You’ll now see an icon, customized for the dragon breath type, along with the text description. If you scroll through the options in the breath dropdown control, you can dynamically see the output icon change each time!
You may have noticed that while the icon changes dynamically as you scroll through the options, the breath attack within the text is not. This is because we’re not calling the click() event again, which is what changes our output result. To update the text as we change values in the select dropdown element, you could just call the click() event within the callback of the onBreathChange() event, like so:
The above change will now update the output text automatically, as you change options in the breath dropdown. In fact, you can make this same modification to the onNameChange() handler too, and have the output update automatically as you type new names.
Note, since the click() event also calls e.preventDefault(), there will be a javascript warning in the debugger window. You can refactor out the code for building the result text, into a separate method, to clean this up. Here’s what this would look like:
The original code has been refactored to include a new buildResult() method, which sets the value for our output result variable. We’ve changed the onNameChange(), onBreathChange(), and click() event handlers to call our buildResult() method. This instantly updates the output div, upon changing any of the values. At this point, you could remove the “Generate” button entirely!
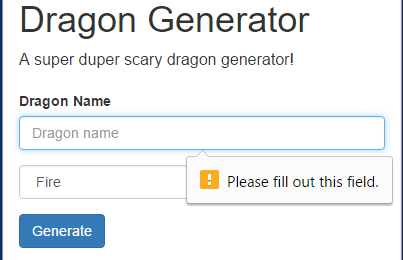
Adding Form Validation
Let’s add some form validation to our react app. Currently, if the dragon name field is left blank and the user clicks the Generate button, nothing will happen. This is a little confusing for the user. It would be better to show a validation message, such as “Please enter a dragon name” or similar text. Luckily, we can easily do this with a simple HTML5 required attribute.
In the HTML, within the render() method, find the input element for the dragon name and add the keyword required to the element.
The required attribute enables HTML5 form validation on the input field. This attribute activates when the submit button is clicked.
If you try running the project, you’ll notice the validation isn’t actually working. This is because the click() event, within our code, is currently calling e.preventDefault(), which cancels the event from going further to the browser. As such, the required attribute doesn’t get a chance to act.
Let’s fix this by verifying this.state.name has a value. If it’s empty, we’ll skip the call to e.preventDefault(), allowing the default form submission logic to execute (this will show the HTML5 validation message). If the name has a value, we call our normal code to display the output (and cancel bubbling the event up to the browser), just like we were doing before.
1 2 3 4 5 6
click(e) { if (this.state.name) { this.buildResult(); e.preventDefault(); } };
If you try clicking the Generate button with an empty name, you should now see the following:
Reading From a Database in React
So far, everything we’ve done has been has been strictly client-based front-end static content. Our HTML form fields, input textbox, and dropdownlist all contain static hard-coded content. To demonstrate how to implement reading from a database within a javascript React web app, let’s read our list of dragon breath types from an online database.
We’ll store our list of dragon breath types as JSON data. Since we won’t actually be modifying the list, we can store it as a read-only data source. What better place to do that, than gist.github.com!
I’ve created a JSON file to store the dragon breath details on Gist. We can read the raw JSON data from our React app, using client-side javascript, and render the results within our UI. Since our data will now be stored online, we have a convenient way of updating the list of dragon breath types, simply by modifying the JSON file on Gist to add or remove items from the array.
To read the file in React, we’ll need to use an AJAX library, such as xhr. To include the library, modify your project file, package.json, to include the library as a dependency.
Next, import the xhr library in your App.js React main web application file.
1
import xhr from'xhr';
Add a new method to our React component for loading the breaths. This method will call the remote datasource url to load the JSON and store it as a variable in our component’s state.
We’ll also need to add the “breaths” state variable to our initial state in the constructor, and include a call to loadBreaths() for initializing the UI.
1
2
3
4
5
6
7
8
9
10
11
12
13
14
15
16
17
constructor(props) { super(props);
this.state = { name: '', breath: 'Fire', result: '', breaths: [] // <-- new variable containing JSON data };
// Load JSON data and initialize breaths variable. this.loadBreaths(); };
Now that our dragon breath array is loaded, we can render the results as “option” elements within our select dropdown list, using the following code in our render() method:
Notice, we’ve replaced the hard-coded list of option elements with a map() function, against our new breaths array. The map statement loops through all elements in the breaths array, rendering an option element for each one. We include a key property, so that React can track dynamic child elements correctly, when creating multiple list elements. We’re simply using the array index as the key.
If you save and reload the web page, you should see some new dragon breath values within the dropdown! This means our code is working, loading data from a remote source.
Refactoring our Dragon Breaths
Our project is complete. However, since we’ve changed our list of dragon breaths from a simple array of strings to an array of objects pulled from an online JSON data source, some refactoring is in order. Specifically, we can replace the clunky switch statement within the UI code (that selects the icon to show for the dragon breath type) with a much simpler variable. Afterall, we now have a list of dragon breath types and their associated icons. Let’s use them!
In App.js, let’s start by changing the definition of our “breath” state variable to be an object, instead of a string.
1 2 3 4 5 6
this.state = { name: '', breath: {}, // <- from a string, to an object result: '', breaths: [] };
Next, change the loadBreaths() method to set a default breath value, by choosing the first item in our list of JSON breath types.
1 2 3 4 5 6 7 8
loadBreaths() { ...
var breaths = JSON.parse(data.body); self.setState({ breaths: breaths, breath: breaths[0] });
... };
Notice in the above code, we were previously only setting the “breaths” state variable. Now, we’re setting “breaths” to still be the list of JSON breath types, and we’re also setting the “breath” variable to be the first value from the list. This will serve as a default value in the dropdown list.
Since we’ve changed our breath variable from a string to an object, we’ll also need to update the output method.
1 2 3 4 5
buildResult() { if (this.state.name && this.state.breath.type) { this.setState({ result: 'The fearsome dragon, ' + this.state.name + ' opens his jaw and breaths ' + this.state.breath.type + ' at you!' }); } };
We’ve simply changed from this.state.breath to this.state.breath.type.
Next, we need to update the onBreathChange event. If you recall, we were previously just setting the value of this.state.breath to be the string value selected in the dropdown list. However, since our breath property is now an object (consisting of a name and an icon), we need to find the breath object in our list of of breaths (from the database) and set our state variable to that item. Here is what the new method looks like:
1
2
3
4
5
6
7
8
9
10
onBreathChange(e) { // Locate the breath from our array, using the selected type from the dropdown (e.target.value). var breath = this.state.breaths.filter(function(breath) { return (breath.type === e.target.value); })[0];
The first change, is that we include a filter call to locate the row in our array of breaths that matches the selected value in the dropdown. The second change is that we set the state variable breath equal to the matching object, instead of just the string.
Finally, our refactoring is just about complete. Let’s update the UI code to replace the switch statement for selecting an icon.
Notice, we previously had a switch statement inside the element, which used a hard-coded list of class names for displaying the icon. Since we now have the icon already associated with the breath, we can simply output the breath icon value as the class name. That’s it!
Building for Production
Now that we have our dragon generator web app complete, as a final step, we can build a deployable version of the project. This allows you to package the contents of the project into a performance optimized set of files, including a single combined javascript file. You can then upload the result to your web server. To build a release project, use the following command:
1
npm run build
A new folder named “build” will be created in your “dragons” project folder. If you look inside the build folder, you’ll find an index.html file, along with a “static” folder. The static folder contains optimized and minified javascript, css, and image files for your project.
To make sure the project runs correctly, you can view it on a local web server before deploying. You can’t simply double-click index.html to view the project, since the react project requires a web server hosting the files (otherwise, you’ll receive security errors in your browser). Luckily, we can use a mini http-server to host the files for us. Here are the steps.
1
npm install -g http-server
The above command will install a mini http-server. Simply typing “http-server” at the prompt, from within any folder, will launch a web server at the root of that folder.
In the console, navigate into the build folder for our project and start the http-server.
1
2
cd build
http-server
You can now view the project on your localhost url port 8080. As a final step, you can deploy the resulting build files to any client-based host, such as GitHub.io.
Note, if you will be deploying the project into a subfolder on your web site, you’ll need to add a small configuration change to tell react how to form relative paths. Simply edit the package.json file to specify a homepage property, as follows:
Just in case you missed the demo link at the top of this article, you can view the complete reactjs dragon generator demo here.
Download @ GitHub
The source code for this project is available on GitHub. To keep the code simpler for learning, the refactored version code is available as a separate branch.
About the Author
This article was written by Kory Becker, software developer and architect, skilled in a range of technologies, including web application development, machine learning, artificial intelligence, and data science.