Introduction
React is a JavaScript web UI framework that allows you to build component-based user interface controls for your web applications. One of the nice benefits of using a framework, such as React, is that each component that you create maintains its own state, independent of other components. It also makes it easy and clean to develop individual UI pieces, separate from the rest of the web application, and that can be re-used in other areas of the app or even in other web applications altogether.
As many existing web applications were previously developed using JQuery, there may come a need to build a new React component or web application that can integrate and communicate with the JQuery web application. For example, perhaps you want to read information from the JQuery-based web application that might be rendered on the page. You then want to display that data within your React component. To do this, your React component will need some way of requesting the data from the JQuery application and then storing it within its state.
Likewise, perhaps you have an existing JQuery application and you want your React component to send data to the JQuery app to be rendered on the web page. You’ll need a similar integration point to be able to communicate with the JQuery app to tell it to update an area of data on the page.
Luckily, communicating from React to JQuery and from JQuery to React is actually quite straight-forward and easy to do. We’ll look at 3 models for doing this, including directly referencing the JQuery object, using an intermediate manager, and finally using a simple publisher/subscriber (i.e., pubsub) model.
In this article, we’ll walk through the steps of integrating a React component with an existing JQuery web application. We’ll cover how to communicate back and forth between JQuery and React, allowing both pieces to update their state and render data on the web page accordingly. We’ll also demonstrate how to access the JQuery $(this) context in order to update parts of the UI and read data from JQuery controls directly from within a React component.
From JQuery to React
There are two basic methods for communicating with JQuery from our React component. First, let’s suppose that we have the following simple HTML document.
1 | <div class='container'> |
Our existing JQuery app will simply consist of a header message and a colored square. We’ve also included a div to serve as the base for our React component to render within. Let’s take a look at several methods for allowing React to interact with the outer application’s UI elements.
We’ll implement 3 different methods for interacting with JQuery from React. The following methods will be discussed:
- Directly referencing the JQuery context from within React.
- Using an intermediate helper class passed to React.
- Using a publisher/subscriber model passed to React.
We’ll start with the most direct interaction, which is to simply pass the JQuery object to the React component.
Directly Referencing the JQuery Context from React
The first method involves passing the React component a copy of the JQuery context $(this) in the constructor, when initially creating the React component. In this manner, React can directly manipulate the existing web application UI elements.
You can see this design in the image below.
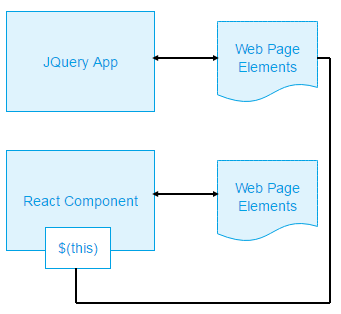
In the above chart, the JQuery App initially creates the React component using a call to React.createElement and passing in the context of the JQuery app to the components constructor. The component can then store the reference (available via the props argument) in its state and use it to update key elements on the web page. This allows the component to change web page elements outside of its own component area.
1 | ReactDOM.render(React.createElement(MyComponent, { context: $('body') }), document.getElementById('root')); |
The above code sample shows how the component is initially created. The component’s constructor is passed a reference to the JQuery body object, which is accessible in the props of the components constructor.
The React Component
The React component for storing the JQuery context and manipulating UI elements directly is shown below. Notice how the constructor takes an argument for props, which will contain the JQuery context that we pass in upon creation. The context is stored within the component’s state.
1 | class MyComponent extends React.Component { |
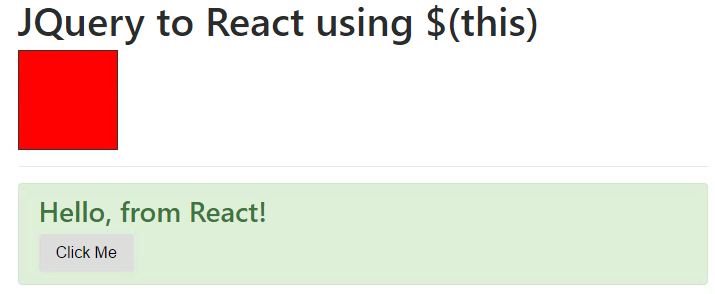
The component defined above renders a simple message and a button. When the button is clicked, the component accesses the JQuery context to change the background color on a UI element outside of its normal scope. A screenshot of the application is shown below. You can also try the demo.
Using an Intermediate Javascript Class
A second method involves passing the React component a reference to a Javascript class object, which will serve as an intermediary for communicating between the existing web app and the new React component. The component can request data and values from the intermediate class or ask it to update certain areas of the page with new data.
The flow chart below shows the layout for how a React component can communicate with an existing JQuery app through an intermediate class.
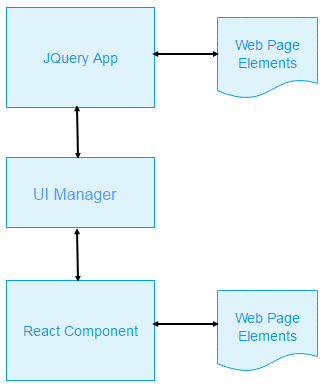
In the above chart, notice how the JQuery app controls its own portion of web page elements. Likewise, the React component controls its own portion of web page elements. The React component receives a copy of the intermediate Javascript class, so that it can receive notifications from the parent JQuery app, as well as request updates to the main web page (outside the scope of its own portion of elements).
A key benefit of this approach is the separation of concerns between the React component’s responsibility for UI elements on the page and the JQuery app’s responsibility for its own UI elements. The component can maintain its own separate portion of the web page, while allowing JQuery to continue to own the rest. The component can request updates to the display outside of its control, by issuing a request through the managing class, with the JQuery app responding accordingly.
An example of instantiating the React component and passing it the intermediary class is shown below.
1 | ReactDOM.render(React.createElement(MyComponent, { context: UIManager }), document.getElementById('root')); |
Notice in the above code, instead of passing the JQuery context as we did in the first example, we’re now passing a reference to a JavaScript helper class. The helper class will contain methods for manipulating various UI elements and state, outside the scope of the React component itself.
The UIManager class can be defined as shown below.
1 | var UIManager = { |
Notice the above class simply contains two methods for handling the color of the square in the page. We can retrieve the current color value of the square or change its color.
The React Component
Similar to the first example React component, we can store the context of the outer application in the state of the component. However, instead of the context being a reference to JQuery itself, we’re now storing a reference to the intermediate UIManager class.
The code for this is shown below.
1 | class MyComponent extends React.Component { |
Notice in the above code, we store the UIManager reference, referred to as props.context, within the state of the React component. When the user clicks the button in the component, we call the UIManager through the context to retrieve the current color of the box. We then call the UIManager again to change the color.
Using a Publisher/Subscriber Model
A third example of integrating React with an existing JQuery app is through a publisher/subscriber (pubsub) model. This allows the component to listen for updates from the outer web application, as well as to send updates back. For example, when the user interacts with the existing web application, certain events can trigger methods which are then sent to the React component, so that it can update its own UI accordingly.
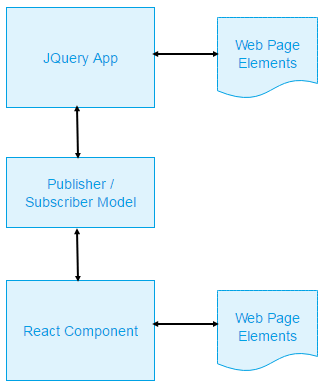
Notice in the above flow chart, we’ve simply replaced the UI Manager helper class with a publisher/subscriber model. In this manner, the React component can be notified of events coming from the outer web application and update its own internal state and user interface controls accordingly. A screenshot is shown below. You can also try the demo.
For example, if the user clicks a button within the existing JQuery application, an event can be sent to all subscribers of the intermediate Javascript class, allowing them to respond accordingly.
This type of design can be implemented with a pub/sub manager class, as shown below.
1 | var PubSubManager = { |
The above class has a subscribe method, where clients can subscribe to be notified of events from the parent application. In this case, when the color method is called by the existing application, any subscribers will be notified of the change, allowing them to update their own internal UIs accordingly.
As an example, consider the case where the existing application changes the color of the square on the page every second. It will change from red to green, in sequence, using the code shown below.
1 | $(function() { |
The above code implements an interval to change the color of the square every second. Normally, the React component would have no access to detecting the change in color to the square, nor would it have direct access to the UI element itself. After all, the square is a div located outside the scope of the React component.
However, with the publisher/subscriber model, the React component can ask to be notified whenever the color of the square changes. In this manner, the React component can then update its own UI, in response.
The React Component
The React component can subscribe to the outer application’s events, as shown in the code example below. Notice how the constructor stores a reference to the application’s context (the pubsub model). This is the same as the second example earlier in this article, but the context is now a publisher/subscriber model, rather than a simple UIManager class.
Additionally, we call the subscribe method to listen to events from the existing web application. In this case, we’re going to handle the onColor event in order to change the React component’s UI according to events fired.
1 | class MyComponent extends React.Component { |
In the above code, our React component consists of a header message and a span tag with a simple badge inside. The badge message changes its label and color, according to the value of the current state color. The state color, itself, is assigned a value from the onColor event, which is invoked as a callback from the publisher/subscriber class in the outer application.
Notice how the onColor callback receives a color name and a reference to that, which is the referencing React component’s context. We need the publisher/subscriber model to send this to us, since the current context of our event handler being called is coming from the pub/sub class, not our React component. In order to access this.state, we need to refer to the parent context, that.state instead.
Directly Calling React Component Methods from Outside
In addition to the above models for communicating between React and JQuery or an outside application, you can also communicate in a reverse fashion, from jQuery to React, by directly calling methods within the React component itself.
When a React component is rendered, it returns an instance of the React component. Using this instance, you can directly call methods within the React components. In this manner, you can control the React component from outside (e.g., from JQuery), by calling various methods on your React class which can change the state, UI, and other behavior of the React app.
Calling React Methods from Outside
Let’s look at a simple example of calling a React component’s methods from an outside (JQuery) application. A demo is also available.
Consider the following web page.
1 | <button id='btnShow' type="button" class="btn btn-primary">Show</button> |
In the above HTML, we have two buttons for showing and hiding. We also have a root div, which is where the React component will be rendered. Finally, we have an output div, which will display text that comes out of our React component.
Rendering the React Component
We’ll first render the React component within our designated div. We can do this with the following code:
1 | var myComponent = ReactDOM.render(React.createElement(MyComponent), document.getElementById('root')); |
Notice how we’re storing a copy of the React component instance in a variable named myComponent, after calling the render command. This is the key to calling the React component’s internal methods.
Let’s add some jQuery to handle clicking the show and hide buttons. When the buttons are clicked, we’ll call our React component’s show and hide method accordingly.
1 | $(function() { |
The above jQuery code simple adds callback event handlers for the show and hide buttons. When each button is clicked, we call the React component’s internal method and display the result in our output div.
The React Component
Similar to the other examples above, our React component exposed public methods for show and hide, as demonstrated below.
1 | class MyComponent extends React.Component { |
The above React component code defines methods for show and hide and renders its own UI. The UI consists of a simple box with a title, a line of text, and a button to change the text. When the React component displays, the user can click the “Speak” button to display a line of text in the React component’s UI.
When the show method is called, we store the callback, which the client (JQuery) code can use to handle the resulting text that is output. In our case, when the user clicks the “Speak” button within the React component, our React component calls the callback and passes it some text. We render that text in our own output div, which is outside of the React component. In this manner, we can communicate from React back to JQuery by direct calls to the React component class, while still allowing the React component to handle its own events and UI accordingly.
Including React in the Web Page
Now that we’ve discussed how to build a React component that can communicate with an external JQuery web application, let’s review a couple of different methods for actually hosting the React component in your web page.
React requires you to include the script tags for interpreting components. You may also need to include script tags for translating newer JavaScript statements into a standard browser compatible format.
In order to view the page, you’ll need to run a local web server (such as http-server). This will allow React to render correctly, as opposed to simply opening the local index.html file in a browser as a file:// url.
Hosting React in a Stand-Alone Web Page
One of the simplest ways to host a React component in a web page is to simply include script tag references for the React library and your components. Since React components can use a syntax called “JSX”, you’ll also need to reference a library for interpreting them, called “babel”. Any React scripts that you create, using JSX, will need to specify the type text/babel in the script tag definition. This tells the browser to allow babel to load the scripts using an AJAX XHR request, instead of the standard script load within the browser. In this manner, the scripts can be pre-processed by babel and subsequently rendered correctly within the browser.
When hosting React in a stand-alone web page, you should include the following tags in your page:
index.html
1 | <script src="https://cdnjs.cloudflare.com/ajax/libs/react/15.5.4/react.min.js"></script> |
The final script tag “MyComponent.js” refers to your React component that you’ve created. Notice the type of script tag defined as text/babel, indicating that this script will be loaded and pre-processed by babel with an AJAX request.
index.js
In addition to the index.html page, you’ll also need client JavaScript to render your React component on the page. Your script can contain the following code to load and display your component.
1 | $(function() { |
In the above code, we use a call to setTimeout to delay the rendering of the React component until the page has fully rendered. If your web page is also using JQuery, you can include the code within a JQuery document-ready function as well.
Hosting React from a Module
A more convenient approach to including React in a web page is to package the React components into a distributable npm module.
You can do this using a helper tool by following the steps below.
1 | npm install -g generator-react-component |
The above commands will setup a React template project, from which you can create your components from. Once your components are ready, you can package them with the command npm run build.
Note, Windows users will need to edit the file package.json to update the “scripts” section as shown below:
1 | "scripts": { |
After building, you should have a dist folder, containing your component’s javascript file, including a minified version.
Including the Minified React Component in a Page
You can reference the minified distributable version of your React component, by including the following script tags in your web page.
index.html
1 | <script src="https://cdnjs.cloudflare.com/ajax/libs/react/15.5.4/react.min.js"></script> |
Notice, just as in the stand-alone example, we’ve included script tag references for the React library. However, there is no need to include babel this time, since the distribution process handles this for us. You can simply directly reference your component’s javascript file, and leave off the text/babel type attribute.
index.js
The code for rendering the React component is the same as in our other example, as shown below.
1 | $(function() { |
Hosting React using Require Statements
An additional way to host a React component in a web page is to use the bundle.js file that is produced by the generator tool (located within example/dist/bundle.js). After running npm start to initially run your React app, an example folder will be created within your project’s directory, containing a src and dist folder. You can reference the file bundle.js, within the dist folder, to include your component and React references in a single file. Using this method, there is no need to reference the React script tags in your page. Additionally, you can selectively require specific components to render.
index.html
Your web page only requires a reference to common.js and bundle.js as shown below.
1 | <script src="common.js"></script> |
index.js
Your script page, which renders the component, will need to require the desired components from bundle.js, as shown below.
1 | var React = require('react'); |
Conclusion
We’ve discussed three different methods for interacting with an existing JQuery web application from within a React component. With methods ranging from a direct reference to the JQuery context, an intermediate UI manager class, and a publisher/subscriber model, we can offer a range of design methodologies for allowing a React component to interact with UI elements outside the scope of its internal component.
Of course, there are many different ways to achieve similar designs. You could even reference JQuery directly from within the React component and select elements at will. However, this wouldn’t allow you to gain access to the context/scope of the outer application itself, unless state values are being stored within data attributes on HTML elements. Otherwise, by passing the React component an instance of the application’s context, you can allow for integration of a React component into your existing JQuery application, with little disruption to the remainder of the app.
Download @ GitHub
The source code for this project is available on GitHub.
About the Author
This article was written by Kory Becker, software developer and architect, skilled in a range of technologies, including web application development, machine learning, artificial intelligence, and data science.
Sponsor Me