Introduction
How do you create a virtual reality app for the web?
Virtual reality has amazing potential to revolutionize software applications, communication, and the ways that we interact with each other. Although commonly found within games, virtual reality and augmented reality apps are expanding their applications to many different types of industries, including communications, healthcare, security, construction, travel, and much more. As our society continues to become more technologically advanced and accustomed to remote communication, virtual reality stands to become a core part of how we interact. Even more amazing, virtual reality software and development is completely achievable today in the web browser!
A Really Quick History on Virtual Reality
The amazing potential for virtual reality can be best understood by taking a brief look at its origins, along with how far it has come, all the way through to today’s availability on mobile devices and the web.
Virtual reality began its history in panoramic paintings, where artists attempted to create a more realistic experience purely through 2D imagery. While this was an advance in the experience of imagery, the advent of head-mounted visual devices are what brought significant advances to the experience.
Morton Heilig’s Sensorama in 1957, Ivan Sutherland’s invention of the VR head-mounted display (i.e., virtual reality glasses) in 1968, along with the official naming of “virtual reality” by Jaron Lanier in 1987, brought the technology behind VR through to the modern era.
However, with the availability of VR now on the web, accessible through mobile devices, the potential for much greater application is now becoming a reality.
Mobile VR
Virtual reality applications are becoming increasingly popular on mobile device platforms, including the Android and iPhone. This is due not only to the availability of VR libraries and packages on the native platforms, but also the availability of web-based VR frameworks.
VR frameworks allow developers to create fully interactive and immersive virtual reality experiences through a web page, viewable on a variety of head-mounted displays, including Google Cardboard, HTC Vive, Oculus, and more.
The availability of Google Cardboard, a simple and affordable virtual reality head-mounted display device, makes it possible for a much larger user-base to access VR applications, via mobile devices and the web. For example, Google Cardboard is a VR device that is often constructed from paper, cardboard, or plastic, and offers stereoscopic (3D) vision, compatible with viewing a virtual reality scene. Many different types of affordable head-mounted displays, following in the path of Google Cardboard’s stereoscopic vision, are available and compatible with Android/iPhone web browsers.
Building a Virtual Reality App for the Web
In this article, we’ll walk through how to build a virtual reality app on the web. The app will be viewable in 3D through any web-browser, and can be experienced in full virtual reality with an Android or iPhone mobile device, simply by using the built-in web browser and a head-mounted display. Our app will utilize the A-Frame library for building a VR experience using HTML and Javascript.
The Difference Between 3D and Virtual Reality
Before we get started on implementing a virtual reality app on the web using mobile VR, it’s important to understand just how truly amazing virtual reality can be over 3D. While the two are often confused, as they seem quite similar, let’s take a brief look at what makes virtual reality different from 3D.
3D is a Purely Visual Experience
Almost everyone is familiar with a 3D experience.
Some of the most popular examples of 3D comes from movies, where viewers could wear a red/blue pair of 3D glasses to experience a movie in a new dimension. In addition to movies, other examples of 3D can be found in art, pictures, advertisements, and most notably, in video games. In fact, it’s been common for decades to play games that are designed in 3D, such as Wolfenstein, Duke Nukem, and many more.
However, the difference between 3D and virtual reality is that 3D lacks immersion.
A viewer experiencing a 3D display may certainly feel more engaged in the imagery and, perhaps, may even feel a small amount of immersion. However, the viewer is likely not to experience the deeper level of psychological immersion triggered by a virtual reality experience.
Virtual Reality is Immersive
By contrast to a purely 3D experience, virtual reality takes the viewer to a much deeper level of immersion.
Virtual reality takes advantage of key psychological traits in the human brain that combine to bring the viewer a deeper and much more immersive experience into the scene being displayed.
Virtual reality often takes advantage of a complete 360-degree visual immersion, blocking out all vision of the real world, presents images in 3D and 360-capable view, offers mobility within the environment where the viewer can physically move around within the world, offers interactive capability with other characters within the scene, and may even present physical haptic (i.e., touch) interaction with the viewer through hand, gesture, or body wearable devices.
These key traits behind virtual reality are what separates it from a simple 3D experience. This level of immersion is possible due to three distinct qualities of the human brain that offer illusions and result in triggering the believability and immersion into a VR experience.
The Three Illusions
The theory behind virtual reality has complex psychological groundings. VR was not exactly a simple step up from 3D, but rather based upon psychology experiments on humans. These experiments demonstrated that the human mind can be “fooled” into believing a variety of facts about the real world, simply based upon visual and/or physical sensation.
For example, a person may truly believe that their hand is moving in a certain direction, when presented with visual images different from what is actually occurring with their hand. Similarly, a person may truly believe they are sitting on a beach, when presented with multiple sensory inputs including images, sounds, and perhaps even the sensation of sand on their feet. The human mind can even believe body parts are replaced with inanimate objects, simply by presenting certain imagery to the viewer in combination with a second sense, such as touch.
There are three key psychological illusions that make virtual reality possible and also demonstrate the amazing potential for how far VR can truly go.
Place Illusion
The first illusion that makes virtual reality possible is called the “place illusion”. This illusion has the effect of making the viewer believe that they have been transported into an entirely different environment. Everything that the viewer sees and hears is perceived to be actually taking place, at least in so far, as being believable.
The amazing part about the place illusion is that it doesn’t require dramatic graphics or effects in order for the illusion to take place. Rather, even primitive graphics, consisting of blocks or shapes, are enough to enable the place illusion for a viewer. Of course, the higher quality that the graphics are presented in, the more effective the immersion. However, the human brain is able to interpret even simple graphical blocks as being real-world objects.
Additionally, the place illusion is quite resilient. If a glitch or graphical error occurs, or if the viewer is able to discern an invalid object or boundary, they can easily recover the illusion/immersive feeling by re-orienting themselves within the environment and continuing the experience.
Plausibility Illusion
The second illusion is the “plausibility illusion”. This illusion deals with the subject believing they are within the world being presented and that their actions have an affect on the world. If a viewer pushes a block, the block will move. If a viewer interacts with another character, the character responds accordingly.
The plausibility illusion pushes the level of immersion deeper for the subject, with regard to believability of being within the virtual reality world.
By contrast to the plausibility illusion, if a subject has the place illusion, but then tries to talk to a character in the world, who then completely ignores the viewer, this has the effect of reminding the viewer that the environment is fake. Similarly, if the viewer experiences repeating events or loops (i.e., an apple falling from a tree over and over again), this can also break the plausibility illusion since these events would never happen in the real world.
Embodiment
The third illusion is embodiment. This illusion has the effect of making the subject believe that their body has been changed in part or in whole, to a different virtual body or object.
As an example, the subject may experience themselves in different clothes, or even perhaps, as an animal within the virtual environment. Provided the virtual character moves and responds to the subject’s gestures accordingly and provides this feedback visually to the subject, the embodiment illusion will take place.
This illusion can be so powerful that the subject’s body parts could even be replaced by inanimate objects!
A key factor to create the embodiment illusion is the ability of position and rotation tracking of the subject. This is needed in order to accurately mirror the subjects own movements and display them accordingly in the virtual world.
The Rubber Hand Trick
A famous experiment that shows how powerful the embodiment illusion can be is found in the Rubber Hand Trick.
In this illusion a subject’s hand is placed down in front of them and covered by a blanket. A rubber hand is then placed directly next to it, in place of where their real hand would normally be. By stroking the index finger of the rubber hand at the same time as their real (hidden) hand, the subject begins to believe that the rubber hand is their own. As a dramatic end to this experiment, some researches then take a large mallet and strike the rubber hand - at which point the subject quickly jumps back as if expecting pain from hitting the rubber hand. Of course, the subject was never really in harm’s way, but the embodiment illusion created this powerful psychological effect.
The experiment demonstrates just how powerful of an immersion that can be achieved within a virtual reality word.
On to Creating a Virtual Reality App on the Web
Now that we’ve seen the motivation behind some of the theory with virtual reality, let’s take a look at how to actually create a virtual reality application within the web browser. We’ll walk through how to use Mobile VR using WebXR and A-Frame, in order to create a browser-based app that can be experienced on an Android, iPhone, or any mobile device with a web browser and a VR head-mounted display.
Using A-Frame
For this tutorial, we’re going to use the A-Frame WebVR library. A-Frame is a web-based virtual reality script that allows you to easily create VR scenes using HTML and Javascript. The library not only supports rendering of 3D images, objects, and models, but it also allows for scripting in the form of event handling. For example, gaze events can be handled, which allow you to detect when a user is looking at a specific object. You can move elements around, enable physics for objects to bounce off of each other, and even include 3D spatial sound (sound effects that trigger and get louder/softer as you approach certain objects).
For a quick and easy introduction to virtual reality on the web, take a look at the A-Frame Hello World example.
The example displays a simple scene that consists of 3 shapes within a 3D environment. If you’re on a PC, you can use your keyboard to move right, left, forward, and backward. You can also click and drag to turn your view in 360-degrees of rotation. This type of visibility/movement is important in delivering an immersive experience. Of course, on your computer monitor, the experience is purely 3D - not virtual reality. In order to achieve virtual reality, we need a more immersive experience using at least one of the three illusions described above. Specifically, the “place illusion”.
The place illusion can be achieved, even in this simple environment consisting of 3 shapes, by using a mobile-device head-mounted display, such as Google Cardboard combined with your Android/iPhone. You can then load the url in your mobile device’s web browser, place the mobile phone in your headset, and experience the scene in full 360-degree immersion. This creates the difference between 3D and virtual reality!
Hello World in Virtual Reality
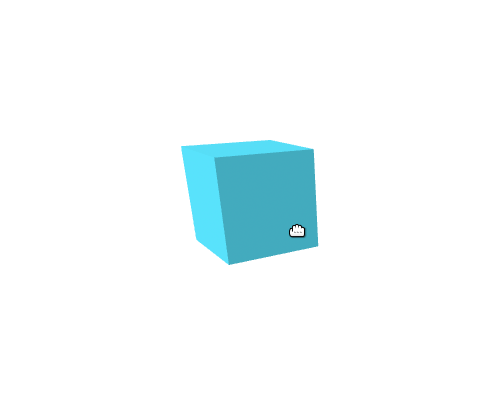
We can start by creating a very simple virtual reality scene using A-Frame. The following HTML example below contains the bare-minimum elements in order to create a VR scene.
1 | <html> |
In the above code, we’re including the A-Frame javascript library. This is what defines the custom HTML tags for implementing a VR scene.
Next, we’re displaying a cube in the scene, implemented by the <a-box> element. If you run this scene, you will see the following example display.
Let’s expand on hello world to make the scene a tiny bit more realistic.
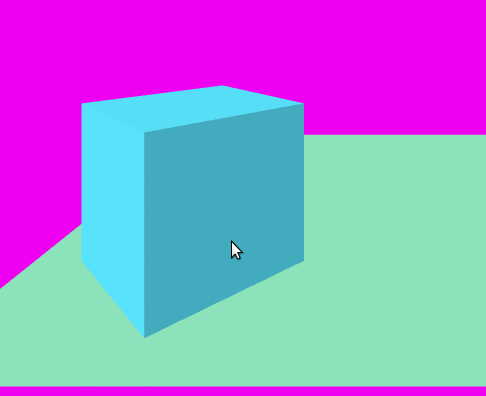
Adding a Ground and Sky to Hello World
One of the things that make a virtual reality experience more immersive is the illusion of being present within an imaginary world. So far, our scene consists of a cube hovering in the air. However, by adding a ground and a sky, we can provide orientation for the user, resulting in a slightly more immersive experience.
To add a ground and a sky, we can modify our example as shown below.
1 | <html> |
We’ve added two new elements to our scene, <a-plane> and <a-sky>. The plane displays the green ground that the cube is now resting upon, while the sky provides the background purple color, seen in the rest of the environment.
We’re getting closer!
Let’s see how to change our sky into a more realistic display of clouds!
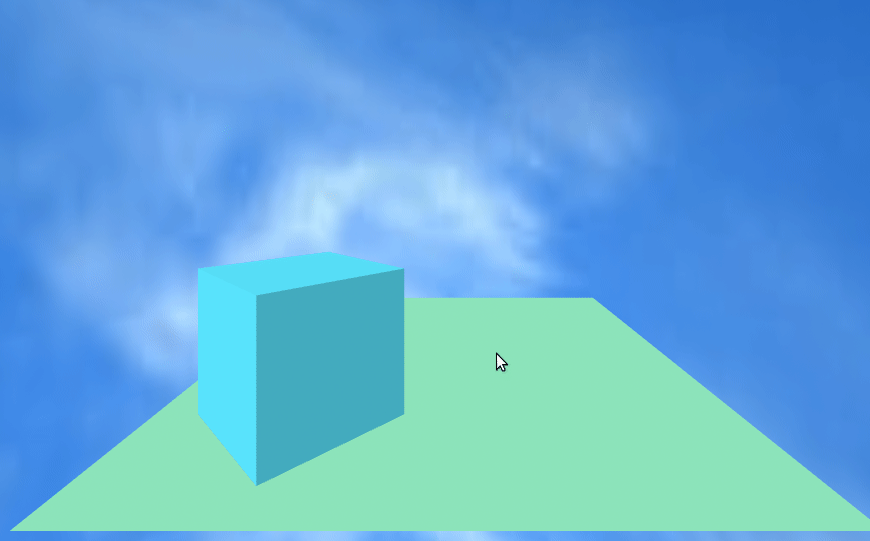
Adding Clouds to Our Scene
We can take one more step into virtual reality immersion by adding clouds to our scene, instead of the purple sky.
To add an image into a VR scene, we can utilize the src attribute of the HTML tag and provide the url pointing to the target image. For example, we can use an image of clouds and update our HTML tag as shown below.
1 | <a-sky color="#FFFFFF" src="images/sky.png" ></a-sky> |
Notice in the above code, we’ve simply provided a src attribute, pointing to an image for our sky, in this case, clouds.
Many of the A-Frame elements can be provided with an src attribute to render images as the material on the objects. For example, just to take this to the next level, let’s see what adding an image to our cube and ground would look like.
Adding Images to the Cube and Ground
Our virtual reality scene is certainly coming along fast, and with only a couple of HTML tags in a web page. Let’s see how the scene would look by adding an image material to our ground and cube, just to make it a tiny bit more realistic.
1 | <a-plane position="0 0 -4" rotation="-90 0 0" width="4" height="4" color="#7BC8A4" src="images/ground.png"></a-plane> |
In the above code, you can see how we’ve simply added src attributes to both HTML tags. This renders the images onto the 3D objects within our scene, helping to add a more immersive experience.
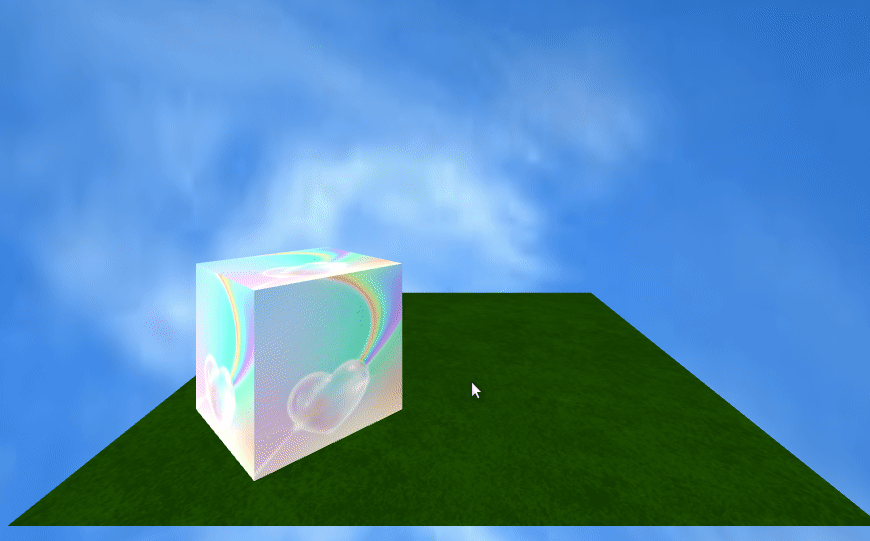
For one last addition, let’s just add an image element into the scene. This demonstrates the difference between traditional shapes, such as cubes and spheres, from actual images that can be rendered in the scene.
1 | <a-image position="0 0.5 -3" src="images/unicorn.gif"></a-image> |
After adding a unicorn image, our virtual reality scene appears as shown below.

We can add additional effects to the scene, such as sound, lights, images, and more. But, we’ll keep it simple in this tutorial.
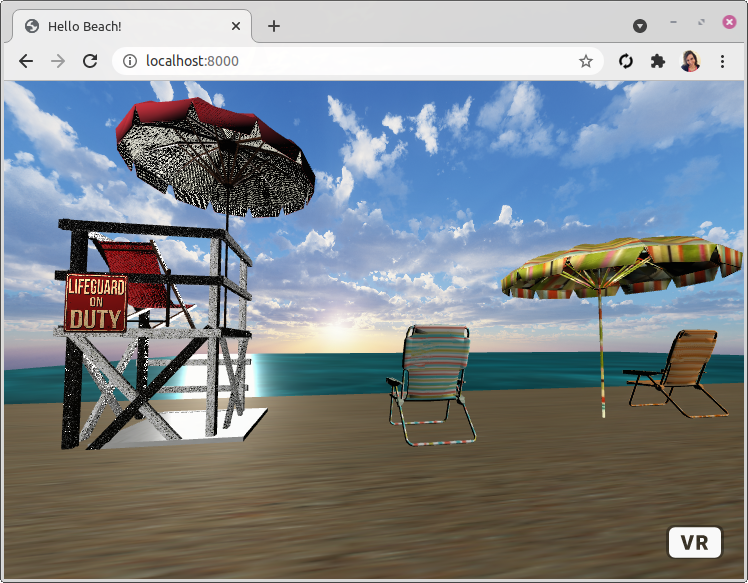
You can view a demo of the hello world scene that we’ve created, or view the source code. If you click the “VR” button in the bottom-left corner of the scene, and place your mobile phone in a headset display, you can even experience the scene in virtual reality!
Creating a Virtual Reality Scene with Unity 3D
Now that we’ve created a simple hello world example virtual reality scene, let’s see how to make a more realistic scene using the popular Unity 3D software.
Unity can be a little intimidating to use, due to its large capacity of user interface elements and functionality. However, it’s also very powerful for creating 3D and virtual reality scenes. You can, of course, manually code a virtual reality scene using only HTML elements with A-Frame (as we’ve seen earlier in this article), although using Unity allows for far more flexibility and precision in placing models, materials, lights, and characters in a much larger world that build within the software. After constructing your world in Unity, you can export the result to an HTML A-Frame project and fine-tune the resulting HTML elements.
Let’s walk through these series of steps to use Unity to create a very simple 3D world and then export the result to a HTML A-Frame scene.
Treasure Chest World
For this next part of the tutorial, we’re going to use Unity to build a 3D scene that we’ll later convert to A-Frame using HTML and Javascript. Our scene is going to be “Treasure Chest World”.
View a demo of Treasure Chest World to see what we’re going to be making.
“Treasure Chest World” will consist of a cave environment with two treasure chests presented in the middle. The viewer can move around the scene and view the gold coins within the treasure chests.
Once our scene from Unity is exported to A-Frame and HTML, viewers can experience the 3D scene in true virtual reality using any Google Cardboard compatible headset!
Building a World with Unity
The first thing that we’ll need in our world is the ground! So, let’s begin by creating a flat plane for the user to stand on. Without a ground, our virtual reality scene might be confusing and/or disorienting to the user.
Keep in mind, since we’re designing for virtual reality, it’s important to be aware of disorientation, dizziness, and other factors that the user may experience according to how our world is constructed.
The first step is to download and launch Unity. Click “New” to create a new 3D project.
You’ll begin with an empty scene. In the left-side toolbar, you’ll start with a “Main Camera” and “Directional Light” object. We will actually be adding our own camera to our virtual reality scene in HTML later on, so we can ignore this for now.
Creating the Ground
Let’s add a ground to our scene by placing a plane. In the top menu, select GameObject->3D Object->Plane to place a new plane on the scene.
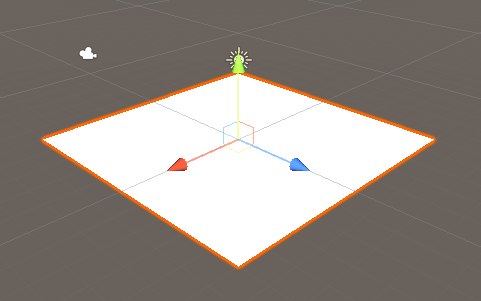
In the right-side toolbar labeled Transform, set the Scale values for X=5, Y=1, Z=5. This will expand the plane across the ground.
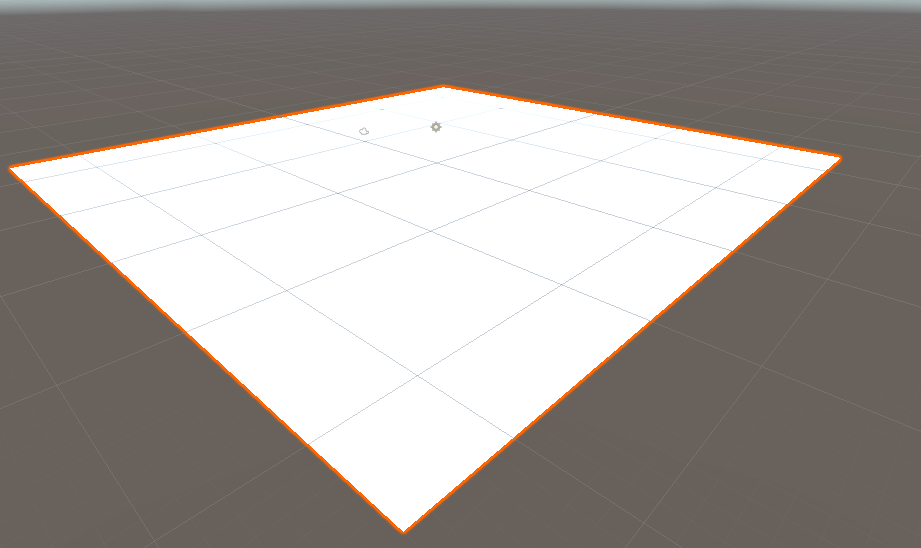
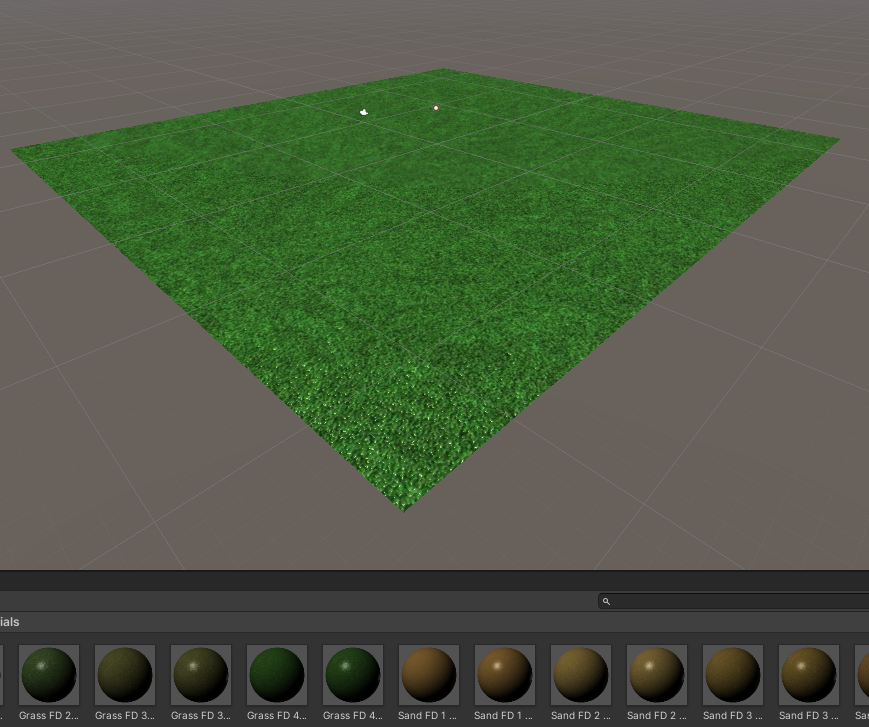
As the plane will initially be white/clear in color, let’s add a material to the ground to look more realistic. After all, when in VR, the user will be walking on this surface. You can find a variety of free materials and 3D objects in the Unity Asset Store. After downloading an asset, you can add it to your scene by selecting Window->Package Manager then select My Assets and choose the desired asset to download locally and import into your project. For this example, we’ve selected a simple grass material from the Ground Materials FD Free package.
After importing the ground materials package into your project, you can find it in the lower-left toolbar, under Assets. Expand the folder Ground materials FD and select the folder Materials. Drag and drop any desired material into the plane to set the mesh.
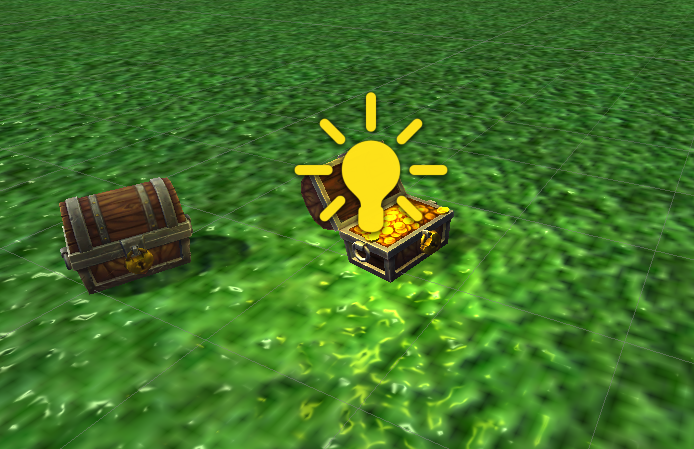
Creating a Treasure Chest
To make things interesting, let’s add a treasure chest into our scene. We will be using the Treasure Set asset 3D object to place on our ground. After importing the asset into your project, select ChestFree, then drag and drop the 3D asset for chest_open onto the ground. You can also drag and drop the coins object and place it inside the chest for additional effect. We’ll set the Scale of the treasure chest to an X,Y,Z value of 3 to make things a little interesting.
Finally, let’s add a point light near the treasure chest for some final detail.
Select GameObject->Light->Point Light. Then position the light, as desired within the scene. In this example, I’ve set the light to have a range of 5, a color of yellow, and an intensity of 2.
This is about all that we need to create a simple virtual scene. The next step is for us to export our scene to HTML.
Exporting a Scene to HTML
To convert a 3D scene in Unity to an HTML virtual reality scene in A-Frame we will use the tool unity-to-aframe.
Download or clone unity-to-aframe and copy the folders unity-to-aframe and CombineMeshes into your Unity project folder, named Assets. After the package imports into Unity, expand the package in the lower-left toolbar under “Assets->unity-to-aframe”. Select the object UnityToAFrame, then drag and drop the Mono Script “UnityToAFrame” into the right-side toolbar to open the tool.
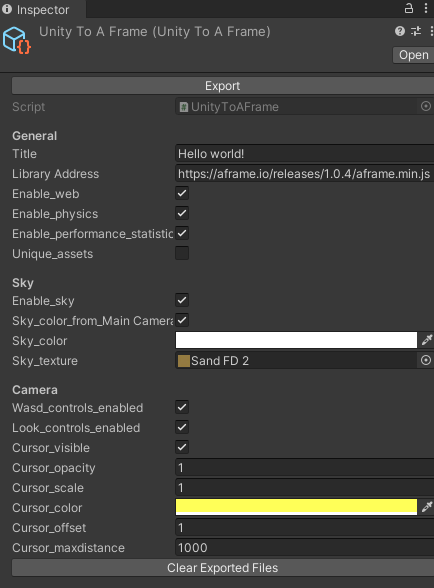
Since we want our virtual reality scene to be fully compatible with mobile devices, WebXR, WebVR, and Google cardboard compatible headsets, we will change the value for Library Address to https://aframe.io/releases/1.0.4/aframe.min.js. Let’s also drag and drop a texture into the Sky_texture field to add effect for the sky. Click Export to create your HTML, javascript, and associated files to create your scene from A-Frame.
After the export operation completes, open the index.html file in a text editor and add an attribute to the camera rig entity to add position="0 1 0" as shown below. This will give the camera object a slightly higher view from above.
1 | <a-entity id="rig" ...> |
Next, start an HTTP server locally in order to view the 3D scene by opening a terminal and entering the command python -m http.server. Finally, open your browser and navigate to http://localhost:8080.
You should see a 3D experience similar to the screenshot below.

Moving Around
While viewing the demo, you can navigate around the world using your keyboard’s arrow keys. You can turn left or right by clicking and dragging with the mouse.
Additionally, you can “look” downward to automatically move in the forward direction. Try this by clicking and dragging with the mouse downward and you’ll notice your viewer begins moving in the forward direction. This type of keyboardless navigation is important as it will allow you to move around the world while wearing a head-mounted-display (HMD) without using your hands.
When using a head-mounted-display, simply tilt your head downwards (i.e., look slightly down at the ground) to move in the forward direction without using your hands.
Make a Little Noise
To complete our virtual reality scene, let’s add a couple of sound effects.
Our scene is already immersive and fully supportive of a virtual reality world. However, we can enhance the immersion with more believability via the plausibility illusion (see earlier in this article) by adding sound effects.
Let’s add a sound effect as the viewer approaches the treasure chest. We’ll also add a sound effect to the edge of the scene, where the viewer could potentially fall off the ground into the abyss!
Modify the index.html file to create a new <assets> section as shown below.
1 | <assets> |
The above code defines two audio assets that we’ll use in our A-Frame project. These sound effects will be compatible in both the web browser and mobile devices, thus, fully compatible on Google Cardboard head-mounted-displays for an even more immersive virtual reality VR experience.
We can add the “keys” sound effect to our treasure chest by modifying our index.html file to add an HTML attribute on the treasure chest tag, containing the following code audio="src: #keys; loop: true; distance: 8;". This is shown below.
1 | <a-obj-model static-body src="url(images/chest_open.obj)" |
Notice, we’ve added a new audio attribute to specify the sound effect. We’ve set the audio to play at a distance of 8 from the target object. As the viewer moves within range to the target, the sound effect will begin playing. This is a spatial sound effect, in that it only plays when the viewer is close enough to hear it - just as you would expect to experience in the real world.
Try this yourself in the demo by moving towards the treasure chest to play the sound effect and then backing off and moving away from it. You’ll notice how the sound fades in and then out according to your distance.
A sound effect has also been added to the trees on the far-left side of the demo scene. Try moving towards the trees to hear the wind!
Source Code and Demo of Treasure Chest World
The complete source code for “Treasure Chest World” is available.
You can also try a demo of the scene using your web browser. Or use a Google Cardboard compatible head-mounted-display (HMD) device to experience the scene in true virtual reality!
Testing the App in a Virtual Reality Headset
Virtual reality scenes created using A-Frame may be viewed in the web browser. However, for a fully immersive experience, viewers can use a head-mounted-display (HMD) device that is compatible with Google Cardboard and mobile devices.
An HMD is simply a set of head-mounted glasses that block out all outside light and vision in order to immerse the viewer within the virtual reality scene.
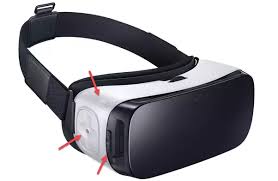
HMD devices work by replicating the display on each eye with a slight fluctuation in alignment, resulting in a 3D visual experience. A tray within the HMD opens to allow you to place your Android/iPhone mobile device inside. You load the web browser to a virtual reality scene (such as our Treasure Chest demo created in A-Frame) and the HMD projects the display from your mobile device onto your eyes in 3D.
To add to the experience, mobile devices respond to geo-spatial coordinates and movement. Recall that we’ve added the ability for the viewer to move forward by looking slightly down at the ground, allowing a hands-free experience with an HMD. Also, as you turn and tilt your head, the mobile device turns and tilts, allowing the virtual reality scene to respond accordingly - moving the viewer around the scene in a complete 360-degree experience.
When the 360-degree 3D visual experience is combined with spatial sound (and even interactive characters and effects), we can provide a more immersive virtual reality WebVR WebXR experience on the web.
Conclusion
In this tutorial, we’ve learned about the psychological theory behind virtual reality that makes VR experiences possible. We’ve seen how the three illusions combine to create an immersive experience for the viewer and how each of the illusions carry their own degree of importance in achieving the fully immersive effect. While not all of the three illusions are necessary to experience virtual reality, some are more important and more forgiving than others. The place illusion can be experienced even with rudimentary graphics. If a visual error is presented, the viewer can quickly regain immersion. However, other illusions, such as plausibility and embodiment can be easily lost when the effects are not accurately produced.
We’ve also learned how to create a 3D scene in Unity and export a converted scene to HTML and Javascript using the A-Frame library. Our demo virtual reality world combines a 3D environment built with Unity, spatial sound effects, and geo-spatial movement that responds to tilting and turning for 360-degree hands-free motion.
Throughout this tutorial, we’ve seen just how easy it can be to create a virtual reality experience. Further, we’ve seen how powerful the result can be - especially when viewed through an immersive head-set device, such as Google Card compatible devices and a mobile phone web browser.
As virtual reality, WebXR, WebVR, and augmented reality technology becomes increasingly more powerful, the ability to create even further immersive and realistic experiences will become possible. Virtual reality has large impacting potential for a variety of industries and software products, helping to bring about a more enhancing, productive, and fully immersive future.
About the Author
This article was written by Kory Becker, software developer and architect, skilled in a range of technologies, including web application development, artificial intelligence, machine learning, and data science.
Sponsor Me