Introduction
What is it like to build an app with IBM Watson, the Jeopardy-winning artificial intelligence machine?
I had recently given a presentation at the 2016 Associated Press Tech Summit, focused on building an application using the IBM Watson platform. In case you’re not familiar, IBM Watson is a technology that offers a number of artificial intelligence and machine learning services for processing unstructured data. This is very similar to the growing technology trend in 2016, where 3rd-party machine learning platforms seem to be popping up across the industry.
As part of my presentation at AP, I had specifically focused on using the IBM Watson Conceptual Insights API to offer an intelligent search engine for locating AP news stories and videos by related concept, in contrast to typical searching that uses simple keywords.
In this article, I’ll go over the steps to integrate with an IBM Watson service. I’ll describe the process of collecting large amounts of news stories, building a Watson document corpus, and integrating with the Watson API using node.js.
As an extra bonus, we’ll also take a brief technical deep-dive into some of the behind-the-scenes mechanics of natural language processing. If you’ve ever been curious about how some of these machine learning platforms work (especially those that process text documents), this tutorial may be especially relevant for you.
What is Watson?
First, some basic background. There are a number of machine learning platforms that have been gaining traction recently. Some of the most popular include IBM Watson, Microsoft Azure Machine Learning API, Google Prediction API, Amazon Machine Learning API, BigML, Wit.ai, DiffBot, and more. In many reviews of services, IBM Watson sits near the top.
Watson’s popularity is not surprising, considering its background.
Watson is an artificial intelligence technology built by IBM. As you may recall, Watson became famous in February, 2011 for winning 1st-place in the game-show Jeopardy. Watson ended up winning a $1 million prize for winning this game (of course, the winnings were donated to charity, as a machine certainly can’t own money - can it?). More importantly, Watson defeated the Jeopardy champion, Ken Jennings, who previously had the longest unbeaten run at 74 games!
This is quite an astonishing feat. Consider the event itself. A computer program had defeated a long-running human champion at a natural language based game-show - a game that involved parsing language, understanding the question, searching for relevant background information, and responding with the correct answer (rather, in this case, it was responding with the correct “question” per Jeopardy game-show rules, which is perhaps, even more impressive).
The fact that a computer program could defeat a human champion at such a complex human task, is really a significant event in AI history.
A Piece of Watson History
It’s also interesting how the IBM research team had initial doubts on building a system like Watson to succeed at this task. The team’s first take on building a machine that could win Jeopardy: “They initially said no, it’s a silly project to work on, it’s too gimmicky, it’s not a real computer science test, and we probably can’t do it anyway”. But, indeed, it worked.
A brief timeline of Watson takes it from 2008, being able to compete with Jeopardy contestants. By 2010, it could defeat human Jeopardy contestants on a regular basis. In 2011, it was the first-place winner, defeating champion Ken Jennings. As of February, 2016 Watson is considered a 2nd-year medical student equivalency. IBM is even preparing to have Watson take the U.S. Medical Board Exam.
Comparing Watson to Siri
Next to Watson, the closest technology that most people are familiar with is probably Apple’s Siri. However, an important distinction is that Siri is largely a search lookup interface. It uses voice recognition to issue queries against back-end providers, like Google Maps, Yelp, Wolfram Alpha, and others.
Watson, on the other hand, uses cognitive computing to form relationships among data, in order to answer a question. Siri may even partner with Watson in the future, which will, no doubt, introduce Watson’s capabilities to a much larger population.
What is Watson, Really?
The game-show winning Watson is pretty fascinating, but what does it actually do?
Watson, at its core, is a natural language processing tool. It uses a variety of machine learning techniques to analyze text, process data, and generate insights from large amounts of unstructured data. It’s this capability that makes Watson appear so impressive with its “understanding” of data.
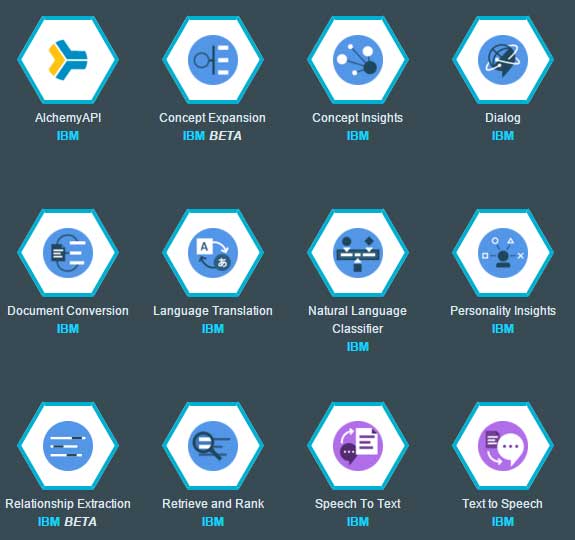
Available Watson Services
IBM Watson offers several different services, including Concept Expansion, Concept Insights, Dialog, Natural Language Classifier, Personality Insights, Relationship Extraction, and quite a bit more.
Concept Expansion and Insights are the services dealing with locating related topics (as opposed to keywords) to a specific piece of text. Watson does this by locating key concepts within an article of text and then determining related concepts. With this, you can search a collection of documents on the related concepts, providing search results with more intelligence, differing from traditional keyword-based search, in that results are based upon related concepts. not necessarily words in the text.
The Dialog service is basically Watson’s version of a chatbot. It requires a bit of up-front schema work to design the chatbot responses, but it offers support for variables and session memory. If you combine Watson’s other intelligence services with Dialog, I can picture a chatbot with some surprising results.
Personality Insights is an interesting service for determining a personality profile, based upon a piece of text. For example, you can submit an “About” page from a blog or the text from your LinkedIn profile and have Watson determine your personality profile. It can be scarily accurate!
Ok, Let’s See It In Action
While preparing the demo application, I had injested 4,000 AP video stories into a Watson Concept Insights database (using the mass import method, described below). The demo allows you to enter either keywords or a body of text as input. The application then identifies key concepts from the text and returns AP news stories that contain concepts related to those.
Here are the results:

In this example, the entire news story text from, “Banks reach $154.3 million settlement on ‘dark pool’ fraud” was provided as input to the demo. Watson identified key concepts, “Dark liquidity”, “Credit Suisse”, and “High-frequency trading”. Note, the actual terms “dark liquidity” and “high-frequency trading” did not exist within the article as keywords. Based on the core concepts, the demo located stories with related key concepts, one of them being “China market uncertainty affects Mideast markets”. This related story had core concepts of “Trading curb”, “Stock market data systems”, and “Stock market”. Interestingly, the term “Trading curb” does not exist within this related search result, but the term “circuit breaker” does, which is in fact, what a trading curb is.
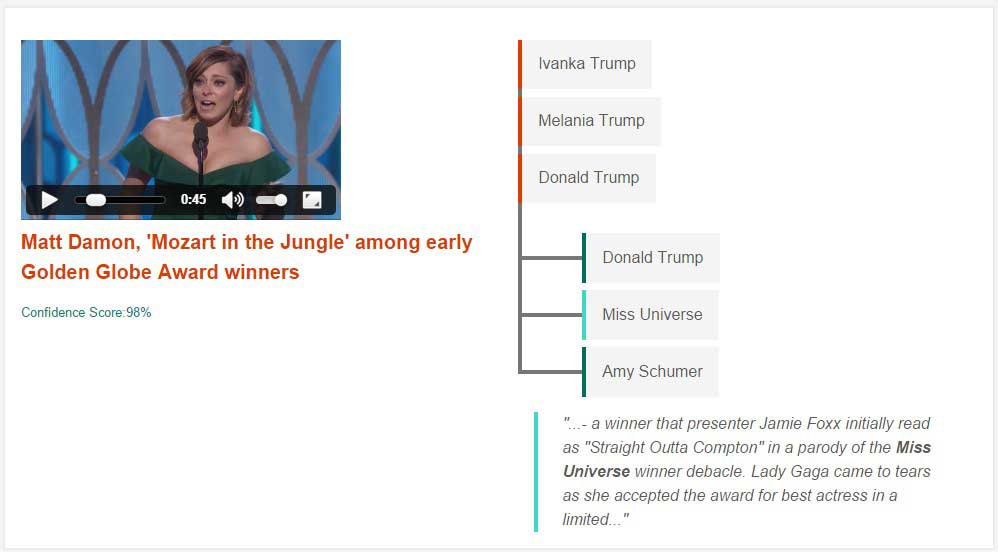
In this second example, the news story “Trump’s wife remains private despite prospect of presidency” was provided as input. Watson identified the key concepts of, “Ivanka Trump”, “Melania Trump”, and “Donald Trump”. One of the videos returned as a result, “Matt Damon, ‘Mozart in the Jungle’ among early Golden Globe Award winners”. This story was identified due to its concepts of “Donald Trump”, “Miss Universe”, and “Amy Schumer”.
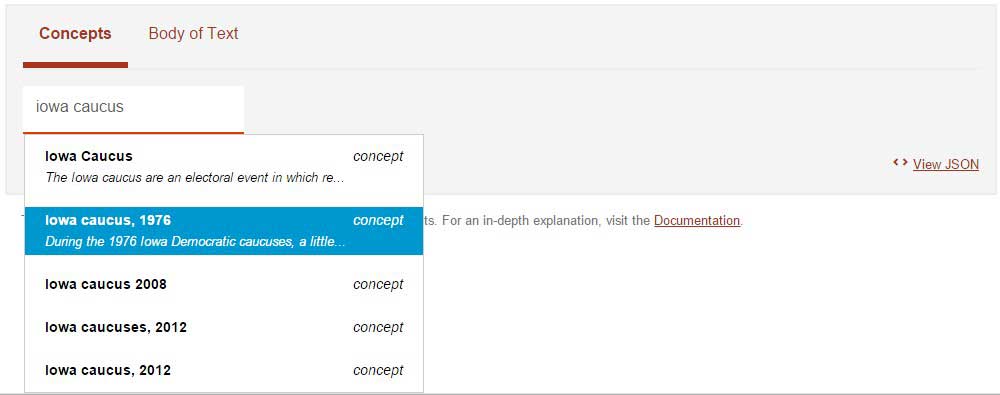
The above screenshot shows how keywords can also be used as concepts. In this example, the keyword “iowa caucus” was entered. Watson responded with a list of related concepts around the topic of “Iowa Caucus” and varying campaign years. Selecting a concept would then display news videos as search results.
Artificial Intelligence Is Not Magic
Despite the popular media attention to recent artificial intelligence and machine learning advancements, AI is not magic. It’s largely a matter of mathematics and statistics.
Watson, at its core, is a system for natural language processing. The internal mechanics are almost certainly complicated, but the underlying principles of natural language processing itself, can be understood.
Introduction to Natural Language Processing
The most basic form of natural language processing is to simply convert text into a numerical representation. This gives you an array of numbers, where each text document typically becomes a same-sized array of numbers. With this, you can apply machine learning algorithms, such as clustering and classification.
This allows you to build unique insights into a set of documents, determining characteristics like category, popularity, sentiment, and relationships.
Bag of Words Model
To provide an overall idea of the basic principles that Watson might use when processing text, let’s take a look at a quick example.
Here are two documents:
1 | Cats like to chase mice. |
We’re going to try to categorize these documents as being about “eating”. To do this, we’ll build a bag-of-words model and then apply a classification algorithm.
The first item to note is that the two documents are of different lengths. If you think about it, most documents will practically always be of different lengths. This is fine, because after we digitize the corpus, you’ll see that the resulting data fits neatly within same-sized vectors.
Create a Dictionary
The first step is to create a dictionary from our corpus. First, we apply a stemming algorithm on the corpus. This will remove the stop-word “to”. Next, we find each unique term and add it to our dictionary. You can see the resulting list below. Our dictionary contains 8 terms.
Dictionary
1 | 0 - cats |
Digitize Text
With our dictionary created, we can now digitize the documents. Since our dictionary has 8 terms, each document will be encoded into a vector of length 8. This ensures that all documents end up having the same length. This makes it easier to process with machine learning algorithms.
Let’s look at the first document.
1 | Cats like to chase mice. |
We’ll take the first term in the dictionary and see if it exists in the first document. The term is “cats”, which does indeed exist in the first document. Therefore, we’ll set a 1 as the first bit.
The next term is “like”. Again, it exists in the first document, so we’ll set a 1 as the next bit. This repeats until we see the term “dogs”. This does not exist in the first document, so we set a “0”.
Finally, we run through all terms in the dictionary and end up with a vector of length 8 for the first document.
We repeat the same steps for the second document, going through each term in the dictionary and checking if it exists in the document. We end up with the following encoded documents:
1 | Cats like to chase mice. |
Classifying Documents as “Eating”
Once the data is digitized, we can classify the documents with regard to “eating”. Since the first document is about chasing mice, or perhaps playing, we’ll assign a 0. It doesn’t really have to do with eating. The second document is clearly about eating. So, we’ll assign it a 1.
1 | Cats like to chase mice |
At this point, we can train the data with logistic regression, a neural network, a support vector machine, or a variety of other machine learning algorithms.
Predicting on New Data
Once our model has finished training, we can try predicting on new data to see if it’s classified correctly. We can try using a new document, “Bats eat bugs.”. This document has never been seen by our machine learning algorithm yet. We want to try and categorize it as being about “eating” or not.
We’ll first digitize the document, just like we did with our training corpus. In this case, we only have 1 term found in the dictionary. The resulting encoding is, as follows:
1 | Bats eat bugs |
A machine learning algorithm is probably going to find a relationship with the particular set bit, noted above. This bit corresponds to the term “eat”, and is found in the training document (“Dogs like to eat big bones”) that was classified as 1 for the category “eating”.
Based on this similarity, our model is probably going to predict our new document as 1.
Training and Predicting a Real Example
Here is an actual example in R. The code takes the original sentences from our example and builds a document-term-matrix. We train on the data using a generalized linear model, with 100% accuracy, and predict a classification for our test sentence.
1 | library(caret) |
The output from this program is, as follows:
1 | > data |
Notice how the 1’s and 0’s in the document-term-matrix align perfectly with what we’ve described above. The order of the terms is a little different, but otherwise the values are the same. Note, the ‘y’ column is the classification for “eating”.
Our code is only using 2 training cases, so it’s not all that difficult to train. You can see the results of training when we call “predict”. It outputs the same ‘y’ values as the training data.
We then run the model on our test sentence (“Bats eat bugs”), that the AI has never seen before, and call “predict”, our program outputs a 1, which is correct, as this sentence is indeed about “eating”.
Is Machine Learning Really That Complicated?
You can see how in the above example, we’ve successfully predicted the classification for a new text document, based on previously trained documents. This is the general idea behind natural language processing.
Of course, we didn’t have to classify on just “eating”. We could have just as easily classified based upon sentiment. In fact, this is a common method for performing sentiment analysis with machine learning (other non-machine learning methods for sentiment analysis include using the AFINN word-list approach).
This is the general idea behind natural language processing and a brief introduction to some of the methods that might be used behind Watson.
Building a Watson App with Concept Insights
The first step to using Watson is to create an IBM Watson developer account. Once registered, you can login to the IBM Bluemix dashboard to begin setting up your Watson services.
In the IBM Bluemix dashboard, select “Services & APIs / Use Services or APIs” and click on the desired Watson service to utilize. I selected “Concept Insights”, which allows searching content by related concepts.
Provide a service name, credential name, and click “Create” to initiate the service. Back on your dashboard you should see a new Watson service that you can configure. Clicking the service brings up the Concept Insights dashboard where you can manage a corpus. Now, it’s time for some coding.
Accessing Watson Services with Node.js
The easiest way to get started with IBM Watson is to use one of the node.js example demos as a starting point. You can find the Concept Insight demo available for customization as a quick start.
The code examples below can be added into the demo source code app.js to extend the application.
Finding Your Account Id
The Watson examples require API credentials, which are provided upon registration. You can supply the credentials to the demo app, as follows:
1 | var credentials = extend({ |
You’ll also need an account id to make API calls with, which can be obtained via a separate API call to /api/account, as follows:
1 | app.get('/api/account', function(req, res, next) { |
With the above code, you can access your demo app at http://localhost:3000/api/account to identify your account id. You can now setup the main settings for accessing your Watson Concept Insights corpus:
1 | var account_id = 'your_account_id'; // obtained via /api/account |
Creating a Corpus
You can create a new Watson Concept Insights corpus to hold your documents, by adding the following method to the demo app:
1 | app.post('/api/corpora/:name', function(req, res, next) { |
This allows you to make a POST request to /api/corpora/name_of_corpus to create a new corpus with the specified name.
Listing Corpus Collections
Similar to the above section, a helper method for listing all available corpuses, is as follows:
1 | app.get('/api/corpora', function(req, res, next) { |
A plain GET request to /api/corpora will now show a listing of all available corpus collections.
Deleting a Corpus
You can add the following method to delete a corpus:
1 | app.delete('/api/corpora/:name', function(req, res, next) { |
Sending a DELETE request to /api/corpora/name_of_corpus will delete the specified corpus (and all documents within it).
Adding a Document to a Corpus
You can add the following method to insert a document into a corpus:
1 | app.put('/api/corpora/:name', function(req, res, next) { |
To insert a document, send a PUT request to /api/corpora/name_of_corpus and include within the body of the request the fields “label” and “document”. “Label” corresponds to the title of the document, and “document” corresponds to the body. It’s a good idea to send HTML-encoded data, in order to preserve any special characters. While this method will insert a single document into the corpus, it’s much more convenient to mass import.
Listing Documents in a Corpus
After you’ve added some documents, you can verify they’re in the corpus with the following code:
1 | app.get('/api/corpora/:name', function(req, res, next) { |
Send a GET request to /api/corpora/name_of_corpus to list the documents.
Importing Multiple Documents Into a Watson Corpus
With the basics out of the way for listing, creating, and deleting corpus collections, it’s time to mass import documents. This is where the real fun begins.
Assuming that you have an array of documents (read from a database, etc) loaded from a helper method “DataManager.load(…)”, you can add the following code to mass import the documents into a Watson corpus:
1 | DataManager.load(function(items) { |
In the above code, we call a DataManager helper method to access our local database and return a list of documents to be imported into Watson. I iterate over each document and assemble a JSON object that will be passed to the Watson API. The required fields for this object include Label, Data, and Name.
I’ve also supplied a user_fields property, which Watson will store along with each document in the corpus. This field is returned back to you, upon querying the Watson Concept Insight API, and can be utilized as desired. In my case, I’ve included a video url, thumbnail image url, and story url for rendering in the search results.
Before inserting a document, the code will first check if the document already exists in Watson. It does this with a “conceptInsights.corpora.getDocument()” request. If this document is not found, this method will return an error of “not found”. We can key off of this message to identify new records to insert into the Watson corpus.
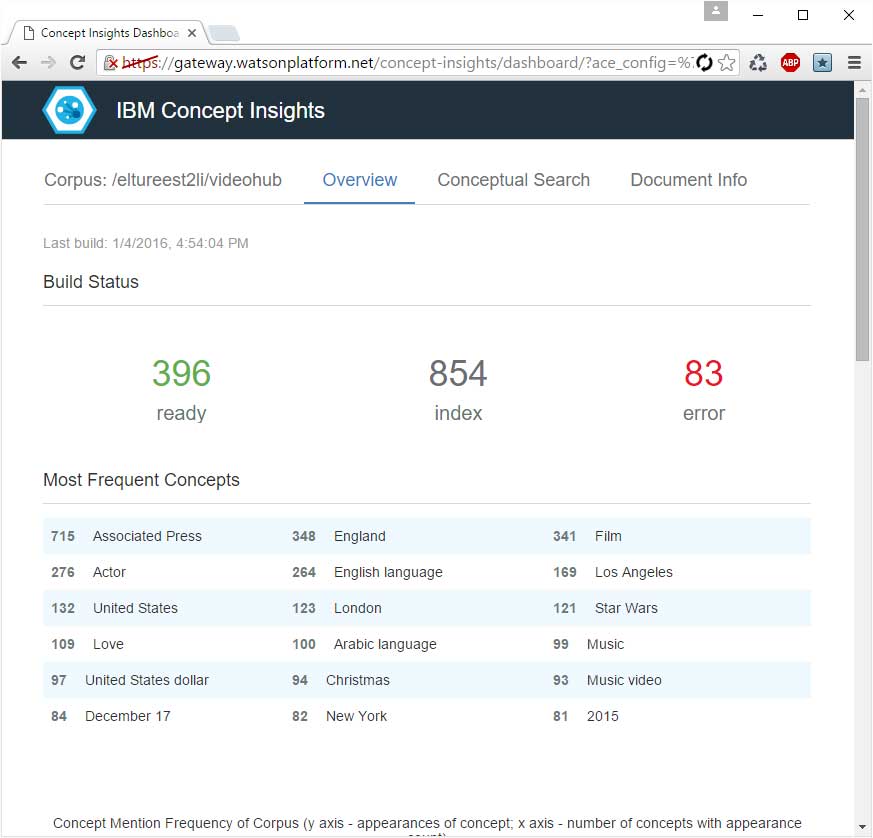
As Watson imports the documents into the corpus, you’ll see the following display on your dashboard (“ready” corresponds to successfully imported documents, “index” is the number of documents remaining to be processed, “error” is the number of failed documents):
Conclusion
We’ve gone through a brief overview of 3rd-party machine learning services, natural language processing, and integrating with the IBM Watson Concept Insight API. Of course, this is certainly a lot to process in a single tutorial. You can investigate the Watson APIs in more detail by browsing the list of available machine learning services, trying the demos, and tweaking the source code for yourself.
About the Author
This article was written by Kory Becker, software developer and architect, skilled in a range of technologies, including web application development, machine learning, artificial intelligence, and data science.
Sponsor Me